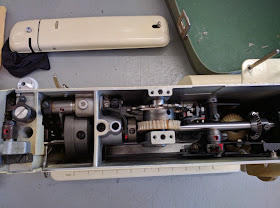
I noticed the zig-zag doing bizarre movements and took a close look under the top.
 |
| Very common problem on Berninas |
Replacing the gear
Searching for instructions led me to here. It's for a 730 sure, but both have cams right? His looked a bit complex, hence the delay. I was planning on making the tools at my dad's tomorrow then just out of curiosity unscrewed the (three) grub screws. The shaft started sliding out very easily!I got it all the way out and lifted the gear out.
Putting the new one on was a matter of removing the screws holding the cam to the gear (two flat screws) and transferring it, then putting it into the machine and replacing the shaft.
I tightened up the grub screws and of course the zig-zag wouldn't work.
After half an hour of removing the gear and replacing it in a slightly different position, I realised what a waste of time this was. Regardless of what I did, the swing always started at the bottom of the needle's travel!
Setting the zig-zag timing
The hard bit was fixing the swing. Before doing this you should look at the cam and see how it works. The swing happens only in the ridge between the lower flat and the raised one and you can set it like this:1. Loosen the two screws holding the worm gear
 |
| Unscrew both of these |
3. Make sure the zig-zag width is at maximum.
4. Move the hand wheel toward you until the needle is on its way up and has already passed through the needle plate.
5. Now move the cam until the flat is just about to start swinging and tighten one of the screws.
6. Check that the swing occurs only when the needle is above the plate. The swing must finish at the same needle height on the other side. You have to make sure the swing is the same on both sides. Once you do, tighten the other screw. You don't want the worm gear to move.
7. Check it again, then test by sewing at maximum zig-zag width.
Certainly a lot easier than expected. The replacement gear has an aluminium base, and the original was steel. Not sure if this will affect the machine but if the plastic is the same quality as the original you can expect it to last 40 years. Not bad!
No comments:
Post a Comment