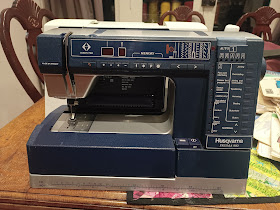
I'm not all that fond of computer controlled machines, as you might know, but as a sewing machine mechanic, I need to know how to fix them.
In the USA these are referred to as 7000 series, presumably because the 2000s were called 6000 series in the USA.
People outside the USA refer to them as Prismas, 900 series, or just 900s.
The model numbers range from 940 to 990, the latter being top of the range with a lot of embroidery options.
I had bought a 950 in Brisbane about three years ago. It actually worked okay once I had replaced the power supply capacitor. After the flooding of Feb/Mar 2022 in Brisbane, I put it in storage and didn't switch it on again for quite a while. When I did it didn't work but I still brought it with me to Melbourne.
It seemed obvious that it was a problem with the main board rather than the power supply board, because the lights still worked, just not everything else. I got around to this several months ago, and decided to ask on the Husqvarna Facebook group.
My FB friend Hans from Norway immediately suggested contacting Theodor Bastberget, who is an electronics engineer with a special interest in sewing machines.
Theodor pointed me to his website which is very helpful if you want to learn how to repair your own machine/s.
Fast forward a couple of months and I now have a 940, 950, 960 and 990 and all but one are working now.
 |
| The only one I got in working condition, the 990 |
If you have one of these machines, the most common problem you will see is from the capacitor having a meltdown. If I see a Rifa capacitor in the power circuitry, I always change it. Replacements are very cheap and available at a local electronics store, and not changing it can have frightening consequences.
Staying with the power supply, the second thing to go wrong is the diodes. There are eight of these, and when one of them fails, it often destroys some of the copper and burns a hole through the board! Theodor has a picture on his website, but the picture below shows that this one has also had this problem.
So, remove the power supply as a unit. Four posi screws at the bottom (avoid using a phillips, it wrecks the screw), one of them with a rubber buffer surrounding it.
Remove the three short screws to get one cover off, then the three long screws. When I did this, I saw the PS board:
This is the underside, and you can see that someone has already replaced some failed diodes. This failure burned through the board and removed some of the copper. Someone has soldered in some new diodes and replaced the missing copper with wires and solder.
 |
| Underside of the power supply board |
Here is the top view:
Not the best job I've seen but it seems to work. I have a special Husqvarna power supply checker that were issued to repairers and I know that this is a working PSU.
The capacitor has also been replaced:
The original capacitor was a Riva, which are brown, even more brown when they fail. They usually fail quite spectacularly with a bang, a lot of smoke and a smell you aren't likely to forget.
If you know that you have a good PSU but the machine still doesn't work, it's going to be a problem with the main board. If you find that the zig-zag doesn't work, the problem will probably be with the stepper motor or the stepper motor controller. Same with the feed stepper motor. When you switch on the power, you should hear a noise as the stepper motor self-tests. If there's silence, but the lights come on, press on the foot controller. If the motor goes, unplug the two stepper motor plugs and swap them. Turn it on again and if it makes the noise, the stepper motor is the problem. If it doesn't, it's somewhere else on the board. I have found that the board's capacitors are prone to failure. The board I'm working on at the moment was blowing diodes. I removed the capacitors (and the diode) and this fixed everything except for the motor (it's a work in progress). Capacitors can hold a lot of charge, so the recommendation is to turn the machine off a full day before working on it. That might be a bit extreme, but I got zapped recently, so I'd leave it an hour or two at least before working on it.
It's unfortunate that you can't check components when they're on the board, but you can get experienced in removing them, and you only have to remove one side to check. The large capacitor I removed (and replaced with the big blue one) tested as a 38 ohm resistor! No wonder it wasn't working.
 |
| Current project, capacitors replaced |
Electronic failures don't mean the end: As far as I know the components are available, and so the machines are repairable.
Edit: The main board was fine, but even though it tested as okay with the Husqvarna power supply test tool, it wasn't! Everything worked except the motor, so I assumed it was a board component. Theodor suggested swapping it with a known good one, which I did, and the machine worked perfectly straight away. I was very pleased and now have another good main board, but since I replaced almost every component in the power supply, the problem with it is the next mystery. If it's the secondary windings in the transformer, I'll have to let that die. It's too expensive to rewind one and they're not that uncommon.


No comments:
Post a Comment