Showing posts with label 201K. Show all posts

Sunday, 1 May 2016

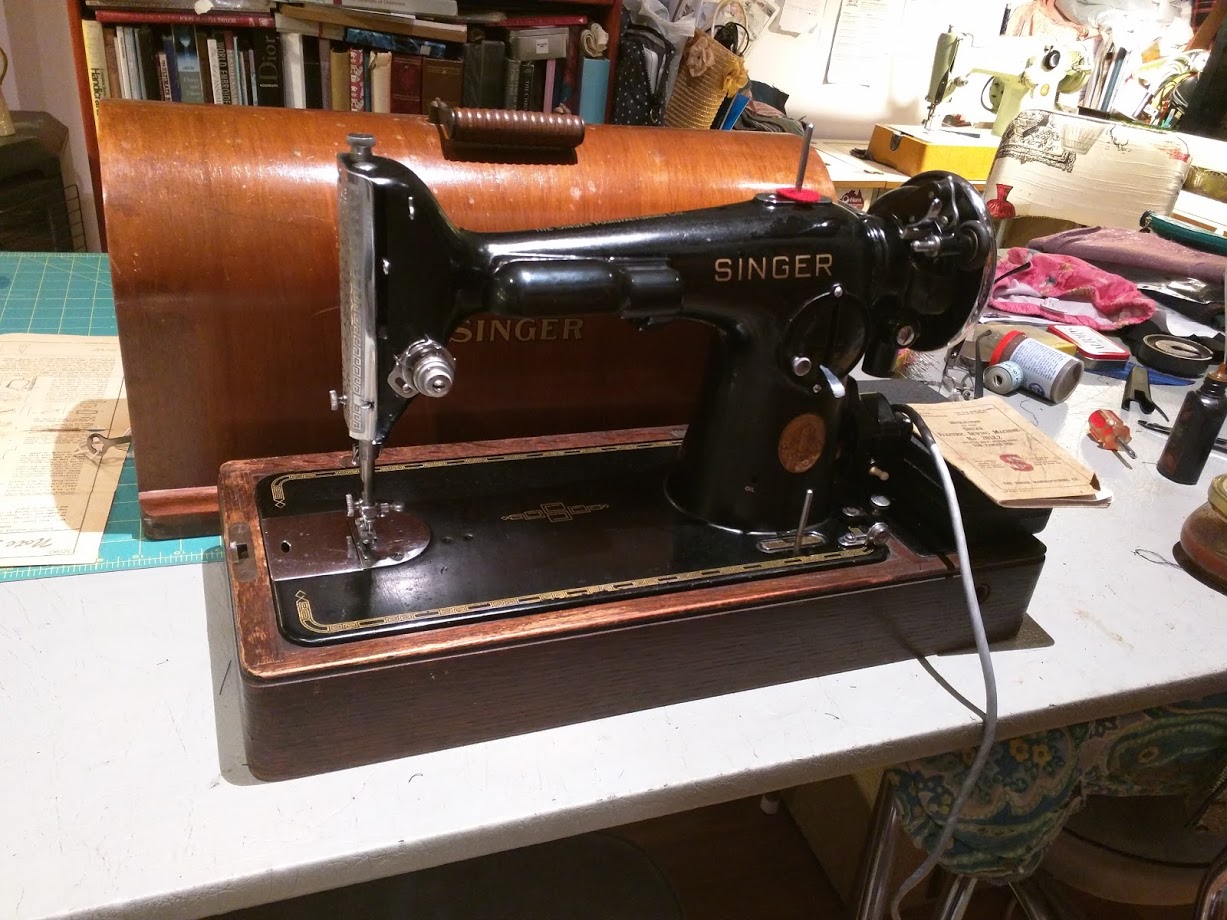
Singer 201K2

After watching The Dressmaker I wanted a 201K2 and it seems that these were never sold in Australia. Thought of bringing one from the U.K. where they're not that uncommon, or converting a 201-2 from 110V but this didn't seem sensible.
Exactly a month ago I won one! It appeared on eBay and finished at 3:30pm when nobody would be watching. I still paid $111.50 for a machine that was in really awful condition. The wiring was actually melted and it needed a complete overhaul.

So, I got it working by my birthday (2nd April) and sold all my other 201s because now I had a rare one. Possibly a bit premature, the motor made a loud rumbling noise and wasn't at all the quiet rolls-royce purr I was expecting.
In the middle of sewing a jacket today I stopped and decided this was a great time to recondition the motor. Nicholas Rain Noe has an excellent article on this and the U.S. version is the same, just for a different mains voltage. I believe the grease might have had something to do with the reduction in the noise but it's still not whisper quiet.
Elusive 201K2
In the first scene of the film Kate Winslet is carrying an empty case. How can I tell? This baby weighs almost as much as she does.

Tuesday, 23 February 2016

Servicing your 201K part 2 - cleaning

This is really quite easy to do. There are two things to remember when oiling your old domestic machine:
1. Clean first, then oil
2. Only one drop per oiling point, except the presser bar wick
If you want to do it properly, you should remove the hook mechanism, which may never have been done. Here's how to do it:
pull slide plate out
angle it so it comes out, avoid damaging the enamel
remove needle, foot and bobbin
Clean out the dirt. Most will be really filthy
nylon brushes are excellent
This is removed next. It's going to be hard. If you can't, clean around it
remove feed dog screws
prise these two lugs outwards a little
lugs out, wedge a screwdriver so hook comes off when wheel turned
lugs have moved, hook is ready to lift off

clean everything so it's at least this shiny
to reassemble, the screwdriver will be on the other side, wheel turned opposite way
Now, put the screw back in and tighten it. I mean it has to be pretty tight. Put a single drop of oil where the hook rotates (metal against metal - general rule of oiling, as is the single drop on each oiling point).
Replace the bobbin and slide plate. Again, careful not to damage the enamel and put it in at an angle.
Well, now we have that over, move on to the end plate. Remove it and notice that every piece of moving steel has a small oil hole. If it doesn't or you can't find it, oil it anyway.
Take note of how stiff the hand wheel is before oiling this then compare it again afterwards. It's my experience that this area contributes most to a machine's stiffness, so you'll be doing the most good here.
turn the hand wheel, oil every joint and the needle bar
Here are just two points. Exactly one drop each.
Also soak the brown wick at the top of the presser bar. Might take 5 or so drops, but don't overdo it or oil will ruin your sewing for months. You can see in that last picture that the top arrow points to a hole, the bottom is pointing at the needle bar. Exactly one drop each is a very simple rule.
Now, tip the machine back. I rested mine on the lid turned sideways. Turn the hand wheel to see what moves and oil it. Remove the two black metal covers and oil in there too (marked with arrows), or vaseline would be better for this, since it will stay a lot longer. Vaseline closely matches Singer's gear and motor grease, which isn't available any more.
If aluminium, the serial number is stamped underneath

At this point, if you're used to modern machines you might be wondering why on Earth you have to do all this when you don't on the modern plastics. Here's why: Plastics have oil included in the plastic and when it runs out, if your machine lasts that long, you are expected to throw the machine away and buy a new one. When your 201K was made, this would have been unthinkable. I developed the habit of cleaning and oiling after every eight hours of sewing and be happy that my machine sews a perfect stitch and will last forever. At the same time, replace your sewing needle. 
Just a few places that need a drop
There are actually quite a number of places that need oil underneath, so make sure you spend some time on this. The manual has quite good instructions too. Yes Singer intended for the user to service their own machine! How about that?
Several oil points on the top
Finally, remove the plate at the back
someone has greased it
It appears that someone has applied a bit of grease to the gears. Singer recommends oil, and oil on the mechanism on the left (which usually gets oil from the oiling hole on the top). If there's heavy grease on the gears it will noticeably slow the motor and you should clean it off. This grease doesn't seem to have affected my machine so I left it alone.

Now, the other things are to look at the drive belt. If it needs a new one, do not buy a round rubber belt: Those belts cause the motor to strain. Get a fibre belt like the machine is supposed to use and adjust the motor so this belt is loose. It is not like a car's fan belt, where tight is good. If you over tighten the drive belt on a sewing machine it will slow the motor and wear the bushings out very quickly. It will also give you poor control over the speed, so keep it as loose as possible without slippage.
The original bulbs were 25W and were extremely good. When I buy a machine it normally has the original Singer bulb or a 1960s 25W replacement that still works. Really, they made things that well a long time ago. Still, they get very hot and you might be better off with a 15W replacement. They produce the same amount of light but the burn you sustain when you touch it is only second degree instead of third. Saves on hospital bills and skin grafts. I buy Riva bulbs which are exactly the same size as the original and they're still made in Germany.

The exterior

If the exterior is a bit dirty, clean it with a cloth and some sewing machine oil. It's the only substance guaranteed not to damage the finish. Only down side is that it's so gentle you might be there a while. Pure car wax works nicely if you want a deep sheen. The later ones were painted with enamel (earlier were Japanned) so you can use car paint products on keeping it beautiful.

Remember: Important

201s have the needle flat to the left and thread right to left

Servicing your 201K part 1

In Australia and in the U.K. there are loads of these machines around. There were literally millions of them made because they were so good Singer made them from the 1930s until the 1960s. A straight stitching machine in the 1960s that cost more than any zig-zag, free arm machine and people still bought them. Why? What's so good about them?
Firstly, Singer made these with special hardened steel gears, so they were as tough as nails. They had an incredibly simple system of getting the bobbin moving (just one bar underneath the machine) which performed a perfect stitch on both the top and bottom, and it could stitch everything from silk to leather. Just about any machine can be made to sew through leather but the 201K can do it easily**.
** As a side note, sewing through leather is easy enough, but leather tends to get dragged back by the presser foot and will bend and break your needles as well as screw up the stitching (and with leather, there's no second chances). To properly sew leather on a sewing machine you need a walking foot (even feed foot) which moves the work from the top as well as the bottom (the regular feed dog), or a wheel feed and foot, which Singer made several models of.

Now, next thing you should know is that the 201K has two forms: The early cast iron one and the later aluminium one. Here they are:
1936 201K3 cast iron weighs a ton!

The 201K23 (201P) weighs half as much
They look radically different because aluminium is so much weaker than iron that Singer had to redesign the head to make it stronger. The stitching mechanism is identical in both machines.
Technically the cast iron version is a 201K3 and the aluminium one is a 201K23, but it's really not important.

Electrical first

Okay, so you have your 201K on the bench, what's the first thing to do? Firstly, check the wiring, particularly between the motor and light. You can see that the one in the photo isn't that great, but I'm aware of it and will be replacing it. Replacement is not trivial and I have a blog entry devoted to this. See here for replacement of the Singerlight wiring.
This is usually the wire that goes first

Check both sides of the bakelite plug

1950s vinyl insulation does not last forever, especially in Australia. It cracks and flakes off. I heard recently from a guy in NSW who said that all old Singer motors are death traps and none of them would ever pass a safety inspection. He has good reason to say that: He imports and sells cheap quality Chinese replacement motors.
Here is my experience: I have fixed literally hundreds of electrical machines and none has ever been a problem. Also, I had one that had been tested and had a safety tag on it when I bought it, so I don't really believe this. If you choose to buy a second hand sewing machine that doesn't have a safety tag on it, you are expected to take full ownership for getting it tested, and the device will have a label saying just this. You have been warned. If you don't know what you're doing and the wiring is suspect, don't plug it in or you might kill yourself.
The wiring is by far the most important thing to check in the same way the brakes are if you buy a second hand car. It's the thing most likely to injure or kill you if it's not good.

Foot Controller

These came with radio suppression capacitors, which are a problem when they fail. Their purpose is to suppress AM radio interference and they also suppress some of the sparking inside the motor. When they fail, they bridge the electrical connections inside the controller and your machine starts sewing at full speed all by itself! All sewing machine repair people I know remove the capacitors. I wrote an earlier blog entry here on these, and the example was the twin capacitors. Here is the procedure in pictures for the single capacitor version:
turn over, remove screws, push the button on the other side
It's the grey thing. I've disconnected one side
disconnected. It would work perfectly well now, but remove it

before putting it back, drop of oil here and around the button

Sunday, 10 January 2016

Unplug your Machines when not in use

If your machine has a bakelite foot controller you should never leave it plugged in when not in use. 
Singer tells you this in (some of) their manuals.
From Singer 201K manual

How they Work


These controllers use a stack of thin carbon discs which are compressed by the button you step on to allow current to flow. A friend of mine in Canada has a blog which explains this in detail: http://www.archaicarcane.com/singerattheraces/

Why Unplug?

There are three good reasons I can think of to unplug your machines:
1. Over time current starts to leak and this can make them hot. This heat can build up enough to start a fire, which can happen when you aren't home or when you're asleep in bed.
2. The higher voltage ones (220V/240V) were fitted with a capacitor to prevent AM radio interference. When this breaks, it short circuits and the machine suddenly goes at full speed. Yes it can happen when you're not at home! 
3. Your machines are fascinating to kids, who love to play with them. If the machine is plugged in, kids are more likely to be injured. When my machine isn't in use I unthread it, place a piece of fabric under the foot, foot down and needle down.

You can certainly tune bakelite controllers so there's less danger, but the best thing you can do is to get into the habit of unplugging them when you're finished sewing. Don't be frightened of these. They're original to the machines and perform very well, so there's no reason to get rid of them. Knowing how they work is valuable.
A few years back I did an entry on fixing them up. Not as comprehensive as archaicarchane's, just removal of the capacitor.


What do they look like again?

Not all carbon disc controllers look like this:
Singer Bakelite Foot Controller

Some of them look like this:
Husqvarna controller from early 1970s
Even clam shell controllers use carbon discs: My daughter's 1970 Singer has them, and a generic Taiwanese replacement I opened up also had them.
I was surprised they all didn't use coiled (resistance) wire, but they don't.
That's all. You've been advised to do it and told why, the rest is up to you. Have fun!

Sunday, 31 May 2015

Industrial strength sewing machines

I wrote a bit of a rant about this on an ad, because dishonesty is one of humanity's major problems.
It's a lot more common in the UK than here, but when you see the words "Industrial Strength" in a sewing machine ad, together and in that order, I can say without any doubt or hesitation that the seller is trying to rip you off.
The seller is attempting to make potential buyers believe that old machines like theirs are in some way just like industrial machines. This is a lie. There is no such thing as industrial strength and a machine is industrial or it is domestic. Actual industrial sewing machines are many times heavier and many times more expensive than domestic machines. People who own factories aren't so stupid as to buy a $3,000 Singer 132K6 to sew upholstery if a $90 Singer 201 plus cheap walking foot will do just as well. If you believe the 201 would do the job, you're dreaming. Industrial machines are made for a very specific task and are made to run at high speed, non-stop for half a day, every day. Your domestic machine is not.
I'll point to an article from a fellow blogger. He describes all the differences between industrial and domestic machines and explains all the reasons they aren't the same.
The other thing not to be very suspicious of is "Semi-industrial". It's true that Singer made light industrial machines for home manufacturing (e.g. 103K, 206K10) but these machines are always mounted on benches with large treadles or bench mounted (and very large and heavy) universal motors.
On eBay UK last week I saw a 99K being peddled as an industrial strength machine! These aren't even full size and have quite a small motor attached. However, there's no way to complain or report the dishonest seller for lying or misrepresenting an item. I doubt this is an oversight for eBay.

Heavy doesn't mean heavy duty: It pays to be suspicious if anyone uses the word industrial for a domestic sewing machine.

Do some research. I'll make it easy for you.
Assuming you have an old Singer, here are two invaluable resources:
ISMACS model list
ISMACS Serial numbers

Look your machine up. The serial number will give you the date of allocation of the serial number of your machine, which will be approximately when it was made. It will also tell you the model number.
The model list gives you a bit more information about what your machine is, the needles it takes, and other information. The usage column clearly tells you if the machine is domestic or industrial.

ISMACS is the International Sewing MAchine Collectors Society. They've collected a lot of information that can help you in making a good choice. You can always ask me or any other enthusiast. Not ripping people off is one of my favourite things.

I don't want you thinking that the 201 isn't an awesome domestic sewing machine either though. If you sew at home you can't do better than one of these little wonders. My favourite is the 201K23. I like the look of black ones the best but the tan versions seem to keep popping up in better condition.

Saturday, 23 May 2015

A Pack of Jeans that never runs out

Good Jeans need never die

I went to Sydney three years ago for the '50s fair and did some vintage shopping that weekend. Found a pair of 501s made in Australia, presumably in the 1980s and the tag inside said "Women's". Since I'd already tried them on and they were really comfortable I bought them.
Now the poor old things were on their last legs (pun intended), so what do I do? Cry about it or sew a pair exactly the same but without the rips?
Poor old things
During the week I went to my fabric shop and bought 2 metres of heavy (210 gsm) black drill. During the '80s when these jeans were available the black ones looked really good too.

Step 1: Making the pattern

This was really easy. No paper involved here, just the jeans and pair of snips. Undid all the stitching in one side of the garment. I chose the right side because of the change pocket. The rivets will stop you separating the whole thing, so cut around them. Don't attempt to remove the rivets, the fabric will rip before they come off. There is a lot of chain stitching in jeans, and there's a trick to undoing this. I've never been great at it but it's all one thread so in theory if you snip a particular thread at a particular end of a seam, you will be able to pull it and undo everything in seconds. I scored a few times but it took a while.
The reason for only unpicking one side should be obvious: You need a finished garment to see how it goes back together. Also, take loads of pictures. Every seam you undo and perspective shots. I'm a belt and braces guy because I've run into trouble so many times.
Might also be a good idea to write down the order you disassembled.
The unpicked side is your pattern, in case you haven't guessed. Here are 18 pictures of the process.
Pockets are not
the easiest
Take pics of the
stitch patterns too.
Where are the
belt loops?
This tells you
the order of
construction
Button holes
are key hole
Belt loop bridges
waistband and
main garment
Can't take too
many pictures
All details need
to be reproduced
Except the rivets
How the pocketing
goes on
and again
Where are things
attached?
How far pockets
extend
What stitching
looks like from
the inside
Look at that:
Raw edges are
folded.

Step 2: Layout for cutting

Now, fold your drill so the selvedges are together and the right sides are together. Something I noticed with making clothes is that they're usually cut along the fabric, so that's what I went with here. If it hadn't been right I'd have noticed by now. I made them three weeks ago, worn nearly every day since, so they're good.
Lay the biggest
pieces down
The little ones
will go around
Now, all pieces except anything that requires only one piece of fabric (change pocket and fly) goes around the bigger ones. Make sure they're as straight as possible: The straight grain is fairly important.
Make sure you add a seam allowance where required. You can do this any way you like, but I have a great little double wheel tool, with adjustable gap. One wheel goes around the edge and the other marks the new one.
The reason the raw edges folded is exciting is that you won't have to finish the edges at all. Very little on this garment was overlocked.
Also, the chain stitch will have to be replaced since I don't have a chain stitch machine (the 411g could have done it but I never got the special needle plate). What machine to sew jeans on? I chose the black 201K23. This was a "no brainer". Well, I could have used an industrial machine but it's getting a bit cold in Melbourne so a portable in the lounge it is. A couple of people, incidentally, have been quite surprised that a domestic machine was used to make these. New plastic machines would stand little chance. That's progress for you :-)

Step 3: Cutting


Well this is obvious. Cut the pieces out and leave pinned to your 'pattern'.
Cut an appropriate width extra for making belt loops. You should unpick one of the original loops completely and do some maths to work out how much you need. Cut the strips into their pieces and you don't need any seam allowance here.

Step 4: Make the Pockets

Something else I've noticed is the order to construct a garment. For any garment, pockets need to be made first. The top pockets are the hardest thing to do as usual, the rest is relatively straight forward. Make the pockets look like the old ones. You will be cutting the internal pocketing out of 100% cotton poplin. If you want it to look like the original, use white. Poplin is extremely cheap and a metre will do a lot of pockets.
The back poskets are 'patch pockets' and are really easy. Draw the pattern that matches the original (or a different one - your jeans) with a dressmaker's pencil and stitch in orange thread.
Could have been a better match, but I'm not going
stealing the design, just making for myself.

Pay careful attention to where the pocketing gets folded and where it needs to be sewn on the jeans. I got this wrong a couple of times before getting it right. This is why the pockets are a bit more challenging. The more experience you have the easier this will be.
original, holes marks where the rivets were.

Step 5: Prepare other garment pieces

Most of these are simply prepared with raw edges folded to the wrong side. Fantastic news, because all you need is a hot iron (turn it all the way up, to cotton/denim and possibly turn the steam on). If you have a steam press, this would be a good use for it. If you have to pin it, don't use plastic headed pins, might seem obvious but if you do they will definitely melt into your lovely fabric and ruin it (no I didn't do this).

The fly was the only piece I had to overlock, and my old Japanese Singer was easily able to do this. As soon as it's overlocked, compare the piece with the original, mark your buttonholes and make them straight away.
So far you've constructed the pockets and folded your pieces.

Step 6: Prepare your machine

You will need to have a machine threaded up with heavy orange thread and one with heavy black thread. I used the same one only due to space considerations, but 201s are very cheap and I do have two of them. Another thing to consider is this: Same thread in the bobbin. The heavy, strong cotton I used was very thick and I did have to make a couple of modifications to my 201K.
1. Fill bobbin, and notice that it doesn't take much thread. Just a fact, bobbin only holds a Certain amount. If it's three times thicker, it will be only a third as long.
2. Modify your bobbin tension. Pull the thread through the needle plate. Initially it will be extremely tight, but you must loosen the tension spring until it isn't otherwise you won't get abalanced stitch.
3. Change the needle. You will need at least a size 18, possibly a 20 but whatever size the thread goes through comfortable. Do a test sew. When mine stitched it sounded like it was hitting the table with a small mallet! Industrial needles will work in domestic machines. I used a 16x231 which have a round shank. Just make sure you put it in the right way.
4. Do a test sew. Use contrasting thread so you can clearly see that the stitch is balanced. I had to dial the top tension to 7 to balance the stitch.

Step 7: Sewing it together

When you sew the inner part of the legs, you must do the orange top stitching straight afterwards. You won't be able to do this after the outside has been stitched. Same goes with anything else that's top-stitched. Do it as soon as you can or you won't be able to do it at all.
Use the intact 'jean' to see how it should look. The fly is only on one side (the left) and the buttons will be put directly on the other, non-fly side.
The fly should match the detailed pictures you took. You did take detailed pictures, didn't you?
With the leg seams you can hide them by doing french seams (tends to be bulky) or the preferred method is flat-felled seams, which is how jeans are usually made. You can experiment with spare pieces of fabric. Normal seams are even acceptable, which you can finish by pinking or even overlocking (how modern). Rather than reinventing the seam, there's a good explanation of how to do this at http://www.sewneau.com/how.to/flat.felled.seam.html

Step 8: Waistband and belt loops

This is easier than belt loops for a dress. These jeans were much easier because it doesn't matter if the stitching shows. Prepare by pinning the waistband to the rest and mark the position of the loops (compare with the original waistband).
Make the buttonhole.
Buttonholes use normal weight orange thread
Sew one side of the loops onto the waistband first, sew the waistband to the jeans then the other side to the jeans. This will be hard on your machine: You'll be sewing through many layers of heavy drill but with a 201K, if you can fit it under the foot, it will stitch it. This is also true with most of my machines.

Step 9: Buttons

Bought these from Clegs for about $3.75 a set. Extremely easy to install.
1. Punch a hole in the fabric where each one will go using a hammer and nail.
2. Using the hammer, hit the button's 'nail' into the other bit
That's all, Just hit it firmly and it stays put. I hear you can get buttons put on professionally but I doubt it would make any difference.

Well that's it. Want to see what I ended up with?
Not a great selfie.
They look better
in reality.
I also turned them up too much. The top stitching should have been much lower. I'll be fixing this today.
Total cost = $28.75 not including thread or needles. Yes I know you can buy a pair for less in K-mart but are they as good? Are they made by a person who loves doing this or a slave? Also, I have the pattern and experience now. Hmm... maybe a pair made in tartan or polka dots next :-D

If you don't have a 201, well first of all why not? They regularly sell for less than $100 (I've bought a dozen or so and none was more than $50) and secondly you can do this on any older full size machine. A model 15, 66 or 27/VS2 would hammer this garment into shape pretty easily too.