Sunday 19 April 2020

Elna Supermatic

This machine is from the hoard I'm supposed to fix and sell (I'm doing the responsible thing and not selling during the lockdown). There are four Elnas from around that time and three are like this one.
I've sort of given away the ending there. It didn't look anywhere near that good before I did my thing.
After the cleaning and oiling, it was making this thumping noise. It took about twenty minutes to realise that this is an Elna and therefore has a drive rubber on the motor (see the post from a few years ago on the Lotus).
I removed the hand wheel and sure enough there was a rubber wheel. This one was longer than the Lotus one but very similar.
I had a couple of 50c rubber bumpers left so drilled one with a hole much smaller than the motor shaft. Removing the existing rubber was not easy. You have to drive a pin out while holding the motor still. I jammed a very large screwdriver against the rubber to give it a bit of resistance.
Drive rubbers in foreground. Original is black
The replacement must have a small hole because there is only the pressure of the shaft stopping it from spinning, so to make this work, the rubber needs to take a lot of effort to push onto the motor shaft and you should also minimise the effort needed to turn the machine over.
If you find that this doesn't work, get something higher, so it matches the original and that you can make a very small hole for the pin to go back.
One rubber bumper in place
It works beautifully for me. The way to avoid the problem is to use your machine every now and then.
Oh and here's the 1962 manual I scanned and made into a PDF. It's made to be printed double-sided A4. Original size was approximately US Legal, so if you scale it up it'll be about the same as the original.

Saturday 11 April 2020

Bernina 740 Industrie

This machine was found on Gumtree and was in Melbourne but it was the start of December and I was driving down there (it's 1,750 KM from me) for the holidays. The guy kept it for me and had thought I'd driven down just to get the machine and was driving back immediately, bless him!
Can't believe that it was advertised for 3 weeks without any other offers.
It's a 1967 Bernina 740-11 industrie. It had some surface rust from sitting outside, but overall is in excellent condition. Almost identical to the favorit, except for the needle, motor (clutch motor), bobbin winder (external) and knee lift (in the bench). The clutch motor looks almost new and the rest looks in excellent condition.
The first thing I noticed was how fast it is. He plugged it in to test and it went through that test fabric in about a second.

Bernina 740 Industrie
It didn't come with many accessories or any spare bobbins (and they're not common or cheap - got mine from Cyndy). The machine has a full rotary hook (hence the speed), loads the bobbin from the back and uses the industrial (round shank) version of the common domestic needle - 16x231/1738/287WH.
It had a lot of issues. After checking the wiring and cleaning the motor, the machine's timing was seriously out. The needle was timed to hit the bobbin case every time. Not sure why the previous owner didn't just get it fixed but the problem was that the needlebar height, hook timing and feed timing were all massively out of adjustment. I suspect the previous owner, an electrical engineer, had bought it to sell on and doesn't know anything about sewing machines - There were two empty ten packs of needles and a broken one up the spout. It took a while to fix it all but she now sews a perfect stitch. The ultimate test was a tiny stitch with an embroidery stitch.
Nicely balanced at last!

It has a full rotary hook, vertical bobbin with a reversed bobbin case (inserted from the back).

 I'm really happy with this, and it should get well used at my place, especially now we have this plague and the caregivers need us to make them scrubs.

Sunday 26 January 2020

Singer spade connector power connectors

I had a lot of trouble with these when I started with old sewing machines, because some had been rewired wrongly, and nearly all the rest were in need of rewiring.
Here's the problem: Singer used rubber insulation right up until the 1950s, so if you have just bought a machine of that vintage, you will probably find that the insulation has cracked off, exposing the live and neutral wires.
If you don't rewire it, you'll need to make sure you have circuit breakers and good life insurance.
Just after Christmas last year a friend gave me her stash of old motors and foot controllers. She'd cut the wires on all of them so they definitely needed new wire anyway, but here's one I looked at this morning.
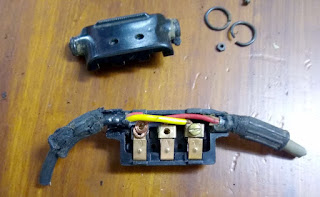
 
original wiring on both sides
The spade connectors were used on almost every electrical machine made in Kilbowie or Penrith. The US and German machines mostly used a solid round pin plug and socket, so I'm only dealing with non-US machines here.
They are all supposed to be wired like this, so if you (like I have) come across an occasional machine that's different, you will find it's been fooled with by someone and my advice would be to change it back. It's safer, and much handier if you have a lot of machines.
The wire on the left was the power cord, the one on the right was the foot controller. These ones actually look in pretty good shape, because they're the later type with plastic insulation. In Singer wiring, Yellow is live and red is neutral.
In the next photo you can see the replacement. Incidentally, you should make the foot controller cord at least 1.2m (four feet) or it may not reach the floor. In Australian wiring live is Brown and neutral blue, so I put them back in the same order. The foot controller wiring is not important, since it isn't dependent on direction and there's no earthing involved. If you switch the live and neutral, you may notice a disturbing mains frequency vibration in your machine. Not necessarily dangerous but it feels it.
I have colour coded them in the picture to make it really obvious. Mains power live on the right, neutral on the left. Foot controller wires are left (with the mains live) and centre.
Do not forget to place the circular clips over the new wires before attaching them to the plug. Shape the wires by wrapping around a thin screwdriver and 'tin' them with solder so they keep this shape and ensure that strands of copper don't wander or break off.

power from left spans outer pins, FC centre and right. It's a good idea, once you have the wires perfectly shaped for the contact, to stiffen it with solder. Alternatively you can use round crimp connectors, but the part the wire is crimped in makes it too large for my liking.
Now, you should note that I have also replaced the padding rubber with a similar width piece of plastic. The reason for this piece is to clamp the outer insulation and preventing the wires being pulled if you're a bit careless with the plug.If you don't do this it will all be loose and you will be able to see the wires inside. It wouldn't take much effort to dislodge the wires from the screws like this.

Finished controller.
Now screw the plug back together, replace the circular clips, test the plug and pat yourself on the back.
When using my own machines, I make a habit of not unplugging the power plugs. It's easier and tidier to put the presser down on a small piece of fabric then the needle down and wrap both cords in opposite directions around the machine before placing the lid back.
And here's a wise saying I learned as a child "There are old electricians and there are bold electricians, but there are no old, bold electricians".