The last part for sure, because I've finished it now. Probably could have done it in one day if all things had gone smoothly, or maybe I'm just being stupid.
Before we start
Attach the lining to the self under both arms, joining the seam allowances (will not show). The other places we join the lining to the self are the cuffs, the bottom and the zipper.
Ribbing
This is the hardest thing to find these days. Not sure why but if you plan to make an English style bomber jacket, the ribbing for the cuffs and bottom must be a very close match to the self. It's not expensive, just not around a lot.
2 x cuff at 15cm h x 18cm w
1 x hem at 15cm h x 73cm w
The cuffs must be closed, i.e. stitch the ends so you have two 15cm high cylinders.
Now, put the cuff over the self so the rib looks like a sock. To make sure it is even, you will have to mark 1/4 way around each and match the marks. A basting thread (small stitches) will help it to stay there as you sew, or you can pin the quarters and stretch the cuff carefully as you sew. If you pull the fabric as it's being sewed you'll bend the needle so it will break onto the needle plate (so don't). Sewing stretchy things onto unstretchy things is something you work out after a few mistakes.
Now sew the other right side onto the lining. It's been a couple of days since I did this so I can't recall exactly how I did it, but I recall having to poke the ribbing inside what I was about to sew, so there was an exposed seam. This was the only way I could to make a really neat job. There was also a lot of pulling things inside out.
After you've done this, it will look like this:
 |
| Can you see where I pushed the ribbing in to be able to stitch? |
After stitching, we pull the self from the lining and have them obviously joined by the cuff.
 |
| Looks like a mess, but... |
Now, pull them the right way.
 |
| Finished cuff |
Now you need to join the self to the lining. Topstitch around where the cuff joins the self. If you didn't do this, the lining would be free to slip around and you'd end up with a varying size cuff.
Do the other side now.
The bottom rib needs to be joined to the small pieces of self we interfaced.
 |
| Might need a ball point needle |
Now turn the garment inside out through the zipper space. You should see that we're running out of places to turn it inside out, and our aim is to sew the zipper in last of all.
Mark the rib and self into halves then quarters (ignoring the interfaced piece).
Stitch the end pieces (the interfaced pieces) one side to the self and the other side to the lining so the self and lining aren't joined (if you join the lining and self at this place you won't be able to insert the zipper). Now join the ribbing piece to both the lining and the self (all four layers together), matching up the quarters.
 |
| Always pin then baste before sewing. |
Turn the garment the right way, and inspect your good work.
 |
| Beautiful! |
Not quite done yet. You need to baste then top stitch down the join of the interfaced self and the ribbing.
The Zipper
Zippers aren't that hard. Just make sure the first half you sew on is on flat, then don't position the other half unless the zipper is closed. It's a real pain undoing a well sewn in zipper so make sure you're careful.
The logic of getting this one in is simple because it's reversible. Both the lining and the self must be folded and the zipper will sit on top. We can also use still being able to access the inside to make a very neat job. The lining and self are firstly folded and this is pressed into shape. Pin one half of the zipper into position on the folded part (the placket), making sure it's not too long (hard to correct for). Baste and remove the pins.
 |
| Never just pin a zipper, or it will end in tears |
Once you've made sure you have only sewn it to the folded part, check it for straightness. Once you're happy with it, sew into position using a zipper foot. Don't try and reverse over the stitch with this foot on (it usually doesn't work), instead pulling both sides of the thread to the wrong side and tying them together.
Now it's in place on the self, bring the lining fold into position on the other side of the zipper. Pin and baste it, then top stitch neatly through all three layers.
Put the other half of the zipper on now and fasten it. Now you can position the other half on the other self fold. Pin it, baste it then test it. If you miss very slightly with the first half of the zipper you can make up for it by positioning the other half accordingly. Make sure it's in the right position. If not, re-pin and re-baste and try again. This is like pockets, in that it'll look bad if it isn't right.
Once you're happy with it, unzip and stitch it to the placket fold. Pin the lining in to hold it and try the jacket on. If the zipper is perfect, pin then baste the lining on, try it on again and when you're happy, top stitch through all layers again.
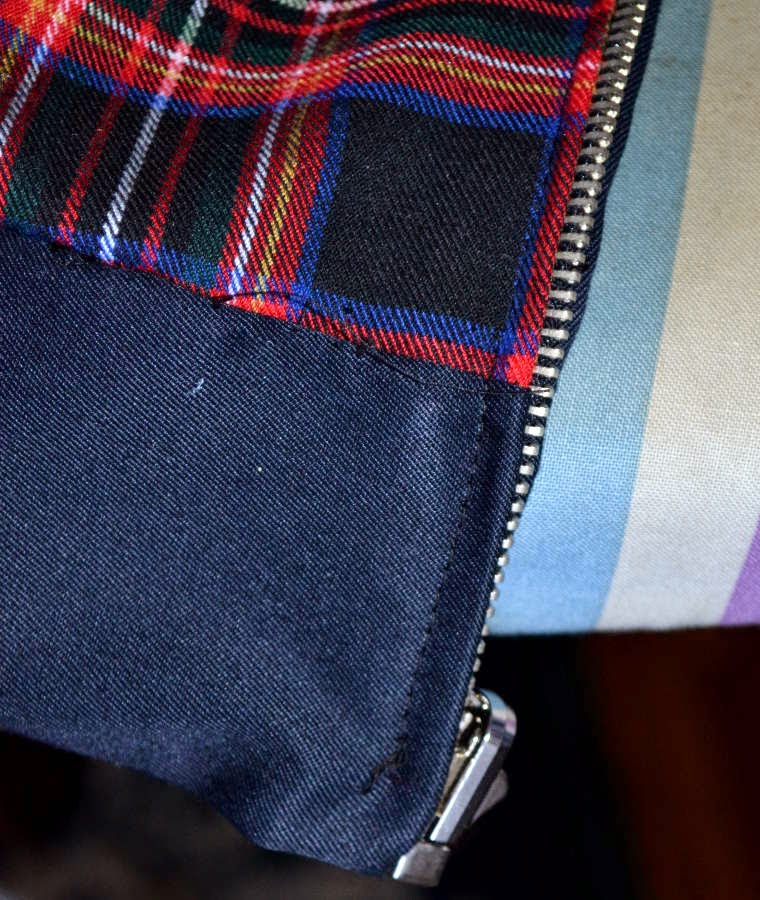 |
| Cut that thread before anyone sees it |
 |
| The two rows is sub optimal, visually |
 |
| The mannequin likes it |
|
 |
| Didn't complain about the back either |
|
Reversed it looks a little unusual, but if your personality is unusual, a tartan jacket might tick all the boxes.
 |
| Even has an external pocket |
|
|
This garment was sewn on my 1959 Singer 320K.


