Saturday 23 July 2022

Servicing a Janome MyExcel

Guide to servicing a Janome MyExcel

For the past couple of years I've been working as a sewing machine technician (yes, really, legitimately, for a shop etc) but left a month or so back. I left because I wasn't learning anything new, was a casual for the better part of two years and caught and spread covid because he couldn't tell the guy who obviously had it to stay at home, or stop coughing or sneezing etc.

Anyway, although not great in some things he's a really great technician and was an excellent teacher. Now that I'm freelancing again, I can use some of the new skills and pass them on to others. Servicing a machine is no longer just fixing it, but make it as close to new as is possible.

Mechanical Janomes are a really good choice for a secondhand machine. There's not a lot that usually goes wrong with them and if there is something it's usually quite fixable and new spare parts such as bobbin cases and feet are usually available.

I bought this machine (a MyExcel 18W) from my local e-waste recycling place. They sold it to me for very little money because someone else had brought it in not working.

How do I take it apart for servicing?

Remove the presser foot (the whole thing), then the screw the holds the needle plate on, then the bobbin case.

Flip the lid open and remove the two screws. Lift up the left side then remove the left side of the carry handle by pushing it in. The handle and top can now be removed together.

Don't remove the other screws, just these


Unscrew the side panel at the centre and the bottom (don't remove the bottom screws). It helps to also loosen the front screw closest to the top of the side panel. 

Remove the two bottom panels (bottom of machine and under bobbin area).

Red ones are removed, blue are loosened

The front also needs to be removed. This is a bit less straightforward. There are two screws at the bottom (see above) to be loosened, one at the top to be loosened (which you have probably already loosened to get the side panel off), and one to be removed at the top (see next picture).

Remove this, arrow points to a bar that will get in the way

Yes the bar will be in the way in that picture, but it will be less in the way if you set the stitch length to maximum. Also set the stitch width to maximum. In the case of this machine, the stitch length was completely seized. It's unlikely to have been set to near zero before seizing, so you should be okay.

The last screw must be accessed from the right side of the machine. It's only really accessible when the pattern selector is set to buttonhole, so set your pattern to buttonhole now, look directly in and you will see a brass coloured screw quite far in. A long philips head screwdriver is perfect here. Do not remove it, you just need to loosen it a bit for the front cover to be removable.

Lift it from the bottom, manipulate the top left past the shaft as well as the other front part (which stays on), and you should be holding the front cover in your hands very soon.

Problems

So what's usually wrong with Janomes? Number one is reverse getting stuck. Janome uses grease that will harden (like a slow setting glue) over time, especially if the machine is not used. When the grease is new it's a pale yellow or just off white. The darker it is, the harder it is.

Almost all other common issues involve the same issue. Grease hardens, and whatever part of the machine it's on seizes or becomes very sticky. The couple of non grease related problems will be mentioned as I get to them.

The machine's exterior was very dirty but I didn't take a picture of it. I'm sure everyone has seen a really dirty and dusty machine before, so use your imagination. Here are a couple of photos of bits that need to be cleaned.

Bottom of the machine. At the bottom is the bobbin area

Bobbin area very dirty


Top of the machine

The entire machine was like this


Tools other than tools

You will need a toothbrush (a packet of varying levels of cleanliness would be better). Some chemicals to remove dirt - methylated spirits and mineral turpentine are ideal and a jar. An air compressor is very handy too, for drying and cleaning.

Methylated spirits is also fantastic for cleaning Janome plastic. Just don't get it on the lettering. Sometimes it comes straight off too.

There is a nylon brush commonly used by sewing machine mechanics that I use quite a lot. You won't be able to get to everything with a toothbrush because they're only one shape. If you have to clean something that isn't on the side of wherever you're poking, a toothbrush won't get to it.

Some modern grease, preferably with teflon, and some sewing machine oil. 

Some absorbent rags.

You will of course need actual tools as well. A basic set of screwdrivers and an allen key will be necessary. A set of small files will be useful for filing out damage if required.

Inspecting parts

Look at the black bobbin case. If there is damage to where the thread gets taken around by the hook, you need to determine whether it can be fixed. Fixing it means making it smooth again. Any burr on the bobbin case will snag the thread, so you must attend to it. If you don't have small files, you can use emery paper but it's more difficult.

Sometimes this area has needle damage

This one is clearly perfectly fine so I didn't need to do anything.

Next, check the needle plate for damage.

The damage is obvious

This time I wasn't so lucky. Clearly a needle has struck the needle plate several times. The top damage here is first to be filed flat.

Now it's very smooth

Okay, you can see that the area the needle passes through is also damaged, so inspect it.

Again, the damage is obvious


The same issue arises if you don't file this out. Thread will snag and you will get unsatisfactory stitching.

File out the damage so it's smooth

It took just a minute or two to fix this, but if you don't it will definitely cause a problem.

Next thing to check is that the upper timing wheel is tight. To do this you need to remove the bobbin winder. Take a picture of it before you remove it.

Tighten the TWO allen screws
You can either put the bobbin winder back on now, leave it until you've finished the service (it might be in the way) or, like I do, leave it until you have everything finished, smack yourself on the forehead, and then do it.

Next, look at the side. I like to remove the motor and check the bearings, but this model is usually fine. However, the connection block where the plug goes in is often damaged. I really wanted to go to town on this machine so I removed the motor from the machine completely. Partly to make it easier to photograph the stuck parts. If you aren't planning to remove the motor, at least remove the toothed drive belt. This is quite easy: Just slip it towards you at the top and it slides off the hand wheel a bit at a time.

Next remove the hand wheel: Pry off the cover, and unscrew it. The inside will be covered in heavier machine grease but unless it's solid, I leave it alone.

If this slips, you will have lots more work

Clip the two sides of the belt together (to maintain tension), and remove the tensioner bracket then remove the tensioner wheel from the bracket (there's a circlip, be careful when removing this of course). The wheel is usually caked in grease, so clean it all off as well as any parts of rubber belt that may have transferred to it. Once dry, just put a little oil on the cleaned shaft and put it all back on again, including the circlip. Make the tension so it's not pulling on the motor. The toothed belt means it doesn't have to be tight. If it is tight, it will damage the motor.

Don't replace the hand wheel yet, or the motor if you have removed it.

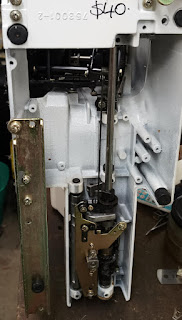
Now get the reverse working. The following photo shows the area you need to be working on. It's at the bottom of the machine.

Reverse gets stuck here

You need to remove the circlip, remove the washer underneath, remove the spring.

Lift the mechanism off the slider on the shaft, and unhook the connecting rod that you can see going off to the right. Now you can remove the whole reverse mechanism. Clean the part it pivots on (shown by the arrow) as well as the mechanism part that comes in contact with it. You also need to ensure that the slider can slide freely. Clean either side of it with the solution. Remove all traces of the yellow grease (I took the following picture after starting this). So 1 and 2 are the reverse, and 3 is part of the feed. Also clean the other end of that shaft.

Some places to clean.
Now oil the positions marked 1 and 3 then replace the reverse mechanism and the connecting rod that activates it.

If you were just here to find out how to fix the reverse that's it, but for a service, remove all of the dirt and grease on the rest of the bobbin mechanism. Position 2 requires a small smear of grease.

Grease these spots

You don't need to overdo the grease. I like teflon grease (and oil) because they tend to resist the effects of gravity better than the other stuff.

So now you have attended to the bottom and side of your machine. 

The top is mostly easy but there's usually sticky grease on this shaft.

You know what to do

Remove the screw and bracket, and the shaft should now be movable. Dissolve the grease at the top and at the bottom.

Remove the gold coloured bracket that the light is mounted onto for better access to the needlebar and presser foot and clean with solvent then dry and re-oil.

Replace the bracket.

There's some more grease around the top. Remove as much as you see and replace with new.

Remove the grease first


 Now it's time for the difficult part. Not for any reason other than some of it is difficult to get at. Move the stitch width lever (if you can), and you should see the front two discs turn. If you can't move it (this one was seized) I can assure you it is supposed to move separate to the rest of those plastic parts.

If it is not moving easily, insert a small flat bladed screwdriver between the moving and static parts and brush in some of solvent. Here is a picture of it. I know I wouldn't be keen without one.

Notice the grease is gone now

If yours is also seized, it's just that the grease has once again set and glued the discs together. Clean all the grease away (it took several applications with this machine) and keep at the solvent between the discs. The lever will start to move freely. Keep it going, sometimes this takes a good half hour of work to un-seize.

Once it's freed up it isn't usually the end of the story. The rest of that mechanism is also invariably also seized or at least sticky. Brush away as much as you can see. You will need as much access as possible, which is why I said not to replace the hand wheel, belt or motor. 

In particular, this shaft needs to be cleaned thoroughly. The separate parts of it need to be able to move easily.

Move the pattern selector to move this

Move the pattern selector to get maximum access to the shaft, and apply the solvent both ends as well. Once the parts can move freely, oil it (I don't grease this).

When you change the stitch length it should be pretty easy but you should see the feed dog moving. If it isn't moving, then the shaft that controls it is still stuck and you need to keep working on it until it's working properly.

When you move the pattern selector and the stitch width lever, you should see the needle bar move left and right. If it's sticky, you need to keep working on it.

Getting these parts free is the hardest part of this job. Once you have done it, give yourself a big pat on the back. Its neither quick nor easy to do this.

Reassembly of your machine should take a while too. This is because before putting any external plastic back on, it must be cleaned. This is possibly the strongest lesson I learned from the shop. The machine must also be made to look as close to new as possible. Before putting a panel back on, clean all the dirt off. If the machine is yours, this should make you feel much better about using it. Use methylated spirits or cleaning solution. The latter is safer for the decals.

Put back the motor if you removed it, and the bobbin winder, power socket etc.

Put the front on first. Make sure both controls are set all the way to the right, as well as the levers, otherwise they won't enter and you'll have to take the cover off again to fix this. Once it's back on, don't tighten the top right screw just yet.

Replace the side cover. Put the screw back, tighten the screws at the bottom, then tighten the front cover screw. Replace the pattern selector knob.

Replace the front cover screws and tighten the ones you didn't remove, including the ones at the bottom. Make sure the tension release is connected.

Replace the bottom bobbin area cover then the bottom cover.

Replace the top cover and carry handle at the same time.

Replace bobbin case, needle plate, bobbin and bobbin cover.

Hopefully your machine should be working perfectly now. If there's still something wrong, you're more likely to learn from it if you have to go back and do it all again.

Please give me feedback. If there's something wrong with these instructions I'd like to know. I'm writing all of this from memory, which at my age isn't all that great.

Sunday 25 April 2021

Husqvarna 6440

 These are called Vikings in the US. These machines were made in Sweden until the 1980s.

They have several very common issues. In fact they're so common that it's rare to not find one or all of them wrong with a machine. The ad came up on marketplace, a Husqvarna 6440 for $20. Extraordinary price but here are the issues in order of importance:

1. Broken pattern gear. Without an intact pattern gear you have a very competent straight stitch machine. Very rare to have one with this intact. Replacements are available but quite expensive.

2. Seized mechanically. Husqvarna used a grease not unlike that used by Janome. It hardens to something that resembles glue, and the old grease all needs to be replaced if you want to use your machine.

3. Broken plastic. The cover is plastic and when bits of it disintegrate, you find yourself gluing the covers on. Not a great look, and very inconvenient when you want to work on it.

4. Capacitor. These tend to fail quite dramatically, with smoke and melted plastic. Best to remove them before they get to that stage.

Okay I asked the seller about the gear. She replied that it was intact and that someone else was supposed to pick the machine up on Thursday, so I bags'd next in line. I got a message on Friday to say it was mine.

The lady had apparently been a salesperson and worked for Bernina for two years in the early 70s then was poached by Husqvarna two years later. It's always nice to know the original owner of a machine, especially if she's knowledgeable and has history in the sewing machine industry.

Back to the machine. The last service was in 2010, and she hadn't used it since then. It was as stiff as a board but would move slightly and as she had said, the original gear was 100% intact. Since it's a one owner machine, I wasn't too worried about too much broken plastic from the case. The plastic piece at the front above the dials had been replaced during the last service. I'm assuming that the technician had spilled cleaning fluids on it and replaced with that of an earlier machine (a 6370). The original one would have said Husqvarna 2000, since the model number is at the bottom right.

After her makeover

Yes it looks really good here but it took about eight solid hours of work to free it all up. This post is mainly to tell you what to do and what not to do with these machines.

Solvent for the grease

I use a 50/50 mix of methylated spirits (denatured alcohol in the US) and mineral turpentine. Get yourself a glass jar and apply with a toothbrush. Before you start though, be aware that although this stuff is like magic on dirt and grease, it will also dissolve the surface of this beloved machine, so apply it extremely carefully. I'll also note that this mixture will also dissolve the surface of any older, black sewing machine, so keep it away from surfaces. I put cotton rags all over any part that could get splashed. If you accidentally splash the paint, don't try and rub it off, or you'll immediately remove the paint. Let it dry. 

Methylated spirit is extremely volatile, meaning it evaporates very quickly, so if you leave it out, it will evaporate and you will be left with pure turps, so put a lid on it. It also will absorb water, which you don't want either, as you'd be putting water inside your machine. I work with a young technician who never puts the lid on and always leaves the jar outside in the heat and rain, so we use a heap of methylated spirits at work.

Removing the covers

Here's the back of a 6370 (I didn't take a photo of the 6440 but they're exactly the same) with the cover removed.

The screws holding the cover on are two big ones on the left and right, as well as one holding the side cover to it, and a couple underneath. Don't remove all of screws underneath, two of them will be securing the mounting for the motor. Be extremely gentle removing these: They're self tapping screws holding onto some very brittle plastic. Even being gentle, a few pieces fell off. I secured them back on with araldyte and waited the full 24 hours before reattaching the covers, also done very gently.

The side cover is removed by pulling out the hand wheel (also plastic and susceptible to falling apart), unscrewing the screw just behind it at the top, and there could be a couple of self tappers at the bottom.

The one covering the needlebar, which hasn't been removed here, is held on by just a simple thumb lever. Pull it down and the cover will lift off easily.

After the covers are all off, blow out the loose dirt and dust bunnies with compressed air or brush it out with a nylon cleaning brush.

Why bother?

I figure you would be wondering by this point why anyone would bother with a machine that has so many issues. 

Firstly, Husqvarnas are the only machines I've seen with a genuine low gear. When engaged, they go slowly and can punch through just about anything. The gearing is controlled by pushing or pulling the bobbin winder. The bobbin winder activates automatically when you place a bobbin on.

Secondly, the patterns available are wonderful, and you can draw little dogs as well as yachts, and remember this is a mechanical machine designed in the 1960s. The patterns (which are covered cylinders) are easy to find because most people discard their machines when they get stuck (in reverse is very common), seized or break the pattern gear.

Problem areas

Pretty much everywhere there is original grease. 

All of the dials get stuck. I removed the pattern gear to get at the grease underneath it and discovered that it was grease-glued to the rod it's supposed to slide along. Everything that could be stuck was stuck, and since she used it ten years ago, either this is the amount of time it takes to set after last use, or it's just that it takes 45 years from new and its time is up.

So knowing that all of the original grease needs to be dissolved, get to work. I work as a technician and have dealt with many of these machines. My own was stuck somewhere the others weren't, which is marked on this photo. 

Pay close attention to these

So, start brushing, keep clear of the paint and pay extra attention to these areas, testing by trying to turn the dials (be careful of solvent coming through the dials).

When the dials are all very free, and the machine is moving easily, there's one more area that will almost certainly be seized: The buttonhole mechanism. Your aim is to set the bottom dial (stitch width) to zero them try and pull it out to activate the buttonholer. I haven't seen one yet that isn't locked up tight. You will need to really work that mechanism, applying solvent, spraying oil etc. When you manage to finally get it pulled out, it also needs to be able to be turned between 0 and 4. As long as you don't apply too much force, you should be able to work the solvent etc through and the machine will be all good.

Make sure the reverse works and that the feed dog drops. Both should go easily and quickly. If there's a delay with the feed dog or the zig-zag, something hasn't been degreased.

Re-lubricate

Finish by making sure that everything you degreased has new grease (non-hardening teflon grease is an excellent replacement for plastic gears), and anywhere that metal touches metal will need oil.

With the new greases available, your machine should last a lifetime if lubricated. Just be careful with those plastic covers.

Motor

Remove the capacitor if there's one there (if you can't do this yourself, anyone who can solder can do it). It's for suppression purposes only and they're not needed in 2021. Check the brushes. If you want to, clean the carbon from the commutator with cotton buds dipped in methylated spirit while the brushes are out. Brushes less than a few mm long should be replaced, but bear in mind they last a really long time and the ones in the machine are probably the originals.

That's how to clean it

Most of these machines will be seized and/or the pattern gear will be broken. If you are so inclined, spend the time and money and the machine will make you fall in love with it. The central bobbin (CB) means it's already a very strong machine even without the low gear. 

I'm not entirely sure why the gears break, because they aren't nylon like Bernina gears (nylon absorbs moisture and becomes very brittle over time).
I hope that it is the seizing up then subsequent use that causes this. If your machine struggles to go, what would you do? You'd probably slip it into low gear and power ahead, right? *snap*
I'm hoping that this is it, because if so mine should outlast me.

Sunday 19 April 2020

Elna Supermatic

This machine is from the hoard I'm supposed to fix and sell (I'm doing the responsible thing and not selling during the lockdown). There are four Elnas from around that time and three are like this one.
I've sort of given away the ending there. It didn't look anywhere near that good before I did my thing.
After the cleaning and oiling, it was making this thumping noise. It took about twenty minutes to realise that this is an Elna and therefore has a drive rubber on the motor (see the post from a few years ago on the Lotus).
I removed the hand wheel and sure enough there was a rubber wheel. This one was longer than the Lotus one but very similar.
I had a couple of 50c rubber bumpers left so drilled one with a hole much smaller than the motor shaft. Removing the existing rubber was not easy. You have to drive a pin out while holding the motor still. I jammed a very large screwdriver against the rubber to give it a bit of resistance.
Drive rubbers in foreground. Original is black
The replacement must have a small hole because there is only the pressure of the shaft stopping it from spinning, so to make this work, the rubber needs to take a lot of effort to push onto the motor shaft and you should also minimise the effort needed to turn the machine over.
If you find that this doesn't work, get something higher, so it matches the original and that you can make a very small hole for the pin to go back.
One rubber bumper in place
It works beautifully for me. The way to avoid the problem is to use your machine every now and then.
Oh and here's the 1962 manual I scanned and made into a PDF. It's made to be printed double-sided A4. Original size was approximately US Legal, so if you scale it up it'll be about the same as the original.

Saturday 11 April 2020

Bernina 740 Industrie

This machine was found on Gumtree and was in Melbourne but it was the start of December and I was driving down there (it's 1,750 KM from me) for the holidays. The guy kept it for me and had thought I'd driven down just to get the machine and was driving back immediately, bless him!
Can't believe that it was advertised for 3 weeks without any other offers.
It's a 1967 Bernina 740-11 industrie. It had some surface rust from sitting outside, but overall is in excellent condition. Almost identical to the favorit, except for the needle, motor (clutch motor), bobbin winder (external) and knee lift (in the bench). The clutch motor looks almost new and the rest looks in excellent condition.
The first thing I noticed was how fast it is. He plugged it in to test and it went through that test fabric in about a second.

Bernina 740 Industrie
It didn't come with many accessories or any spare bobbins (and they're not common or cheap - got mine from Cyndy). The machine has a full rotary hook (hence the speed), loads the bobbin from the back and uses the industrial (round shank) version of the common domestic needle - 16x231/1738/287WH.
It had a lot of issues. After checking the wiring and cleaning the motor, the machine's timing was seriously out. The needle was timed to hit the bobbin case every time. Not sure why the previous owner didn't just get it fixed but the problem was that the needlebar height, hook timing and feed timing were all massively out of adjustment. I suspect the previous owner, an electrical engineer, had bought it to sell on and doesn't know anything about sewing machines - There were two empty ten packs of needles and a broken one up the spout. It took a while to fix it all but she now sews a perfect stitch. The ultimate test was a tiny stitch with an embroidery stitch.
Nicely balanced at last!

It has a full rotary hook, vertical bobbin with a reversed bobbin case (inserted from the back).

 I'm really happy with this, and it should get well used at my place, especially now we have this plague and the caregivers need us to make them scrubs.

Sunday 26 January 2020

Singer spade connector power connectors

I had a lot of trouble with these when I started with old sewing machines, because some had been rewired wrongly, and nearly all the rest were in need of rewiring.
Here's the problem: Singer used rubber insulation right up until the 1950s, so if you have just bought a machine of that vintage, you will probably find that the insulation has cracked off, exposing the live and neutral wires.
If you don't rewire it, you'll need to make sure you have circuit breakers and good life insurance.
Just after Christmas last year a friend gave me her stash of old motors and foot controllers. She'd cut the wires on all of them so they definitely needed new wire anyway, but here's one I looked at this morning.
 
original wiring on both sides
The spade connectors were used on almost every electrical machine made in Kilbowie or Penrith. The US and German machines mostly used a solid round pin plug and socket, so I'm only dealing with non-US machines here.
They are all supposed to be wired like this, so if you (like I have) come across an occasional machine that's different, you will find it's been fooled with by someone and my advice would be to change it back. It's safer, and much handier if you have a lot of machines.
The wire on the left was the power cord, the one on the right was the foot controller. These ones actually look in pretty good shape, because they're the later type with plastic insulation. In Singer wiring, Yellow is live and red is neutral.
In the next photo you can see the replacement. Incidentally, you should make the foot controller cord at least 1.2m (four feet) or it may not reach the floor. In Australian wiring live is Brown and neutral blue, so I put them back in the same order. The foot controller wiring is not important, since it isn't dependent on direction and there's no earthing involved. If you switch the live and neutral, you may notice a disturbing mains frequency vibration in your machine. Not necessarily dangerous but it feels it.
I have colour coded them in the picture to make it really obvious. Mains power live on the right, neutral on the left. Foot controller wires are left (with the mains live) and centre.
Do not forget to place the circular clips over the new wires before attaching them to the plug. Shape the wires by wrapping around a thin screwdriver and 'tin' them with solder so they keep this shape and ensure that strands of copper don't wander or break off.

power from left spans outer pins, FC centre and right. It's a good idea, once you have the wires perfectly shaped for the contact, to stiffen it with solder. Alternatively you can use round crimp connectors, but the part the wire is crimped in makes it too large for my liking.
Now, you should note that I have also replaced the padding rubber with a similar width piece of plastic. The reason for this piece is to clamp the outer insulation and preventing the wires being pulled if you're a bit careless with the plug.If you don't do this it will all be loose and you will be able to see the wires inside. It wouldn't take much effort to dislodge the wires from the screws like this.

Finished controller.
Now screw the plug back together, replace the circular clips, test the plug and pat yourself on the back.
When using my own machines, I make a habit of not unplugging the power plugs. It's easier and tidier to put the presser down on a small piece of fabric then the needle down and wrap both cords in opposite directions around the machine before placing the lid back.
And here's a wise saying I learned as a child "There are old electricians and there are bold electricians, but there are no old, bold electricians". 

Saturday 6 July 2019

1950s Phoenix 283 Automatic

This was given to me a few days back. It had obviously not been used for years. The round rubber belt was broken, but it was so neglected that this was the least of its problems. It was also missing the foot controller, but it came with manuals and pattern cams! I was up for the challenge and have loads of the original foot controller.
It was also missing screws for the door!

The excellent Wernard motor had some issues: The capacitor (inside the motor housing) was  original (the only one I've ever seen in these motors), and just under what you can see in the photo the wires were bare and rubbing against the motor housing.
Capacitor is the silver thing at the top.

Plugging it in would have blown the circuit breaker.
The motor had to be completely disassembled to remove the capacitor (which doesn't have to be replaced), and I also found that the field winding insulation was cracked in three places (one was at the motor housing). I carefully removed the windings, cut the insulation off, then put on some heat shrink insulation, which was shrunk with a soldering iron before I reassembled the motor.

The test revealed that the foot controller wire was damaged and broken, so was replaced with a new lead. New lead means an un-needed power cord. I Wired it up and tested by bridging the wires and plugging it in when it's all back together and the motor runs at full speed.
The rest of it was just cleaning. I dusted off the cobwebs and cleaned the exterior with sewing machine oil. All old oil was also removed from metal with sewing machine oil and chrome polished.

I'm not in a hurry with this. My dad likes to work on the cabinets so he's been removing the 60-70 year old shellac and will be replacing it with varnish.

I'll update when the machine's finished. It won't look like new unless I paint it (the finish is faded, discoloured and chipped), but it'll certainly look a lot better than the poor sad thing I started with this morning, and I know it will sew like a new one. Wernard motors are excellent and more powerful than Singer motors. Also, their foot controllers use wire resistance, which means that they never go out of tune.
After a good clean, she's looking acceptable.

Sunday 30 June 2019

1970s Singer bobbin gear replacement

I was asked if I could fix someone's Singer 514 because it "didn't work".
The patient

A cursory inspection told me that the plastic bobbin drive gears had broken (needle moves and bobbin doesn't when the hand wheel is turned).
This is a very common problem now since the gears last about 40 years before they become brittle enough to break apart. It's probably why these machines don't have much value now, and most people will just throw them away rather than pay to replace them (particularly here in Australia where labour costs a lot). I don't know how long replacements will last, but I imagine you'd get 20 years at least.
I've done this job before, on my daughter's 498K Stylist in 2012. As I remember, the gears for her machine were much better quality than these, but it seems I can't get good ones now.
Where the bobbin gear lived and died

I told her the bad news. Although gears are available (Chinese made, and quite poor quality), the labour cost would exceed the machine's value. She was still keen (she had bought it new in 1973) so I ordered the gear set - they must be replaced as a set because the new ones are cut differently and won't mesh with the unbroken original, and even if they did mesh the unbroken one would break very soon too.
Pre-requisites to doing this job are:
1. You have the replacement gear set in front of you (I ordered them from Amazon).
2. You accept it will take a couple of hours if you haven't done it before, and do the whole job on the same day. You might be surprised how much you can forget in just a day.
3. You know how to time the hook.
4. Have some Singer gear grease on hand.
5. An appropriate Allen key and other tools to remove circlips.
6. Take photos as you go. These pictures are specific to the 514. They're all similar but don't count on them being identical.

Gear replacement

Disconnect the power (duh), remove the machine from its base and remove the bottom plate.

The bobbin mechanical components are then exposed
It's now obvious where the broken gear was.
Our task is to remove both of these shafts and replace the gears, but it's not as easy as you'd think. This is why it takes multiple hours instead of half an hour.
I had to remove the good gear first. Start by removing the circlip at the end nearest the motor (to the right in my pictures), then everything that's holding the shaft components on, including the white plastic gear on the left. You shouldn't need to force the shaft out.
Removal required an Allen key
Here's the shaft halfway out: The eccentrics for the feed dog should just sit there, held in by the rest of that mechanism.
All free and halfway out
The other shaft was tricky. It would not exit easily, and I had to remove the motor mounting in order to get it all the way out (to the right).
Almost there.
It's obvious from this photograph why the motor needs to be removed. The change from the old external motors to these quieter ones necessitated some compromise, and removing and replacing the motor was quite a struggle.
Once the two shafts are out, replace the gears and reassemble. Here are the new ones installed:
New gears installed
That big pointy bit of plastic fouls the movement of the other gear and causes a rough spot on the machine. You might be able to carefully remove a little to eliminate the rough spot, but I left it alone.
This is why I mentioned that the replacement gears are poor quality. It's not hard to make a copy of something this simple, but the people tasked with it still managed to screwed it up.
However, the machine does work acceptably now, where it didn't before, and the stitch quality is as good as it was before the original gear's demise.
After you've got everything back together you will need to correct the machine's timing, because you will definitely have changed to to unacceptable.

Feed timing

Make sure the feed dog is doing what it's supposed to be doing.
When the needle descends to the work, the feed dog will be moving downwards. If I remember correctly the offending plastic protrusion points towards a line etched into the feed timing eccentric (both of which can be seen in the picture above, taken before I'd replaced the latter's grub screw). Align these and you should see correct feed timing. If not, set it manually.

Hook timing

The settings are pretty universal for hook timing. You want it set up so that as the hook passes the needle, the needle has started to ascend and the needle's eye is 3/16" (2mm) below it, the needle position set to the centre. My friend Tammi has much more detail on this on her web site.
This is the setting for every sewing machine