I get sad when thinking about the loss of
industries like clothing manufacture, and disagreed strongly with Paul
Keating in his interview recently with Kerry O'Brien (that four part
documentary that finished last week) where he said that it was something
he thought was a good thing, all these people losing their jobs in
manufacturing. He said they just got a better job. Not only is that certain bollocks, but consider the loss of skill with these industries?
Since almost nobody manufactures clothing in Australia and those
who worked in the industry are literally dying off, we now rely on third world
countries and China to make our clothing. We should all know that their
conditions and wages are very significantly worse than those who worked
in our factories. In what way does this make our country or the
world better?
Now that we don't make our clothing here, all the
equipment has also gone "offshore" permanently. I
feel that we have lost something important. How can we be comfortable with relying on third world
countries? How can we be OK with mistreatment of the people who make our
clothes just so we can pay almost nothing. I know I felt better with a
"Made in Australia" label (or Britain, Ireland, USA) because the workers were
not mistreated. I can't support slavery just because the slaves are in
a different country. Think about that when you buy your next piece of clothing.
My
affection for vintage machines is an extension of my affection
for quality, locally made garments. I love my Pinnock machines (although I don't
use them currently). Made in Adelaide and beautiful things for sure. There's no
need to pollute the air shipping them to Australia (ships can spew out any amount of pollution, as anti pollution laws don't apply to shipping), because they were
proudly made here. Go into a shop and look at a new "plastic wonder" sewing machine. Made
in China, plastic, electronic. Sure it seems to do everything you want
it to, but try sewing through a couple of layers of denim and it won't.
Ask about its warranty - 12 months? It will break down shortly after
this (it's meant to). Now ask who fixes them and how much they'd charge!
Not to mention the extreme discomfort that I for one get when the machine continues after I remove my foot from the controller (the computer feels it necessary to finish a cycle). Older machines don't break down often and if maintained to a basic standard they may never
break down at all. Of the fifty or so old machines I've owned, only one has ever broken. The Singer 498 Stylist, and
this was because Singer started using plastic gears in the late 1960s. However, it was still easy and cheap to fix, and to
give it credit the original plastic gears did last over forty years.
So if you ever wondered why anyone would ever pay $20 for a t-shirt, now you know. If you ever wondered why I rave about a fifty something year old sewing machine, now you know.
Additionally, I do value a treadle: Summer in Australia always comes with power outages. In the middle of a seam? No problem, pop the machine into a treadle cabinet and in a minute or two you're finishing your seam.
Friday, 6 December 2013
Pyjamas for my daughter
These were from a Vogue pattern (EDIT: I lied! They were Simplicity. Number 5552 to be exact), which I just spent some time looking for (unsuccessfully). I'll edit it in when I find it.
(edited out the bit where I raved about vogue patterns - oy!). The garment was very pretty too. Here is the finished garment, modelled by my lovely child:
 It was pretty easy to follow in general, and no doubt I'm becoming slowly better versed at interpreting these instructions, but the older the pattern, the more knowledge they assumed. Simply put, until about 50 years ago, most women bought patterns, fabric and notions then headed home to their sewing machine to put it all together. It wasn't a hobby, but a necessary part of life. For me it's a luxury, a hobby, but self sufficiency seems to be something I value more as I get older.
The pants were made on my VS2, the top on the 320k.
I'm now working on a pair (different design - mine are really a Vogue pattern).
(edited out the bit where I raved about vogue patterns - oy!). The garment was very pretty too. Here is the finished garment, modelled by my lovely child:

The pants were made on my VS2, the top on the 320k.
I'm now working on a pair (different design - mine are really a Vogue pattern).
Singer 401a
I bought a 401g (German made) a few months ago. Apparently it's a fantastic machine that can do everything. It's called "slant-o-matic" and I say apparently, because I don't use it. Well, I love sewing on the 320k so why change? The 401 was just there because I was told I had to have one, and it appeared.
So, now that it was sitting on the shed for months, I see a 401a (American version). This model is probably not as good and it said "doesn't work" on the ad. Well, how couldn't I have a go? I picked it up and had it fixed in no time. Can't even recall what the problem was, but was probably lint. SO which one to keep... You'd think the German version. It is truly more handsome and almost certainly better engineered and built. That's not just because of the German thing, but they were made later, in the 1960s. The American one stays, because it had a full set of accessories and the original manual. It was a one owner machine and apparently I value that sort of thing more!
Here is the 401g:
 Isn't it lovely? When you look from the side you can see why it's called slant-o-matic:
 And the 401a:

Very similar but it doesn't have that rocketeer thing happening at the top. Well, the differences when a machine is this good are stupid. It's like choosing whether to live in a mansion in Paris or a mansion in Switzerland: They're both such unbelievably good options that it doesn't matter!
The 401 has a vertical bobbin, so you can also do embroidery with it. As a bonus, this machine was designed so you can fit not just a needle into its needlebar, but two needles! Yes, two needles can go in, meaning you don't have to buy twin needles for special patterns.
So, now that it was sitting on the shed for months, I see a 401a (American version). This model is probably not as good and it said "doesn't work" on the ad. Well, how couldn't I have a go? I picked it up and had it fixed in no time. Can't even recall what the problem was, but was probably lint. SO which one to keep... You'd think the German version. It is truly more handsome and almost certainly better engineered and built. That's not just because of the German thing, but they were made later, in the 1960s. The American one stays, because it had a full set of accessories and the original manual. It was a one owner machine and apparently I value that sort of thing more!
Here is the 401g:


Very similar but it doesn't have that rocketeer thing happening at the top. Well, the differences when a machine is this good are stupid. It's like choosing whether to live in a mansion in Paris or a mansion in Switzerland: They're both such unbelievably good options that it doesn't matter!
The 401 has a vertical bobbin, so you can also do embroidery with it. As a bonus, this machine was designed so you can fit not just a needle into its needlebar, but two needles! Yes, two needles can go in, meaning you don't have to buy twin needles for special patterns.
Singer 201s are very common, not so popular
It's a bit sad really. The greatest domestic stitcher ever made is the Singer 201. It has specially hardened gears and does a perfect stitch. It sews through practically anything with no fuss whatsoever. In its day, it was, fittingly, the most expensive you could buy and Singer still sold millions and millions of them!
From the moment I used one, my eyes widened and I was deeply impressed with the ease with which it did its job.
Lately there seems to be a flood of them on eBay and Gumtree, and of the last two I got, the first (last Saturday) was free in a cabinet. It was, admittedly, seized and took about two hours solid work to clean and lubricate it, than another ten hours to get it moving properly! The foot controller was also faulty and didn't work at all. It took only an hour to fix and adjust this because I didn't disassemble the carbon pile (the wiring was the problem). I now make a point of always removing any capacitors in foot or knee controllers, and always checking and cleaning the motors. Cleaning them improves contact between the brushes and the armature, and results in a stronger motor.
The second machine was $50, and I didn't actually want this one, but in the picture with the machine was a very nice looking Swiss Zigzagger! It seems I was the first person to call: First of dozens according to the lady. She said she'd done research and they seem to sell for about $50. I told her about the Swiss ZZ and that it was probably the reason for its popularity. Got the machine, attachment and a buttonholer into the car and went home. She had admitted that she had never cleaned, oiled or serviced it and when it got stuck she just pulled out whatever was obviously in the way and kept going again! Needless to say it had an unusual amount of lint and dirt. Additionally, the motor's wiring, like most knee machines, was really stuffed. I carefully replaced the dangerous bits and repaired any damaged insulation. The Swizz ZZ was is very good condition, and all pattern cams were present in their original package. The buttonholer was seized up (I'd never seen one so stuck), and it took days of jiggling to loosen it up. Still not happy with it, so more work required there.
Before I post pictures, I have to suggest why 201s aren't more popular. It is a domestic machine that only does straight stitch. That's it, simply, these days people either want a domestic to do everything or an industrial straight stitcher. The 201 is not to be ignored, however. Add a good zigzagger and buttonholer (which the lady had) and you have a machine that can not only do a perfect stitch but everything else you'd expect. It won't, however, do free motion embroidery/darning very well. Apparently the horizontal bobbin makes it difficult for the machine to maintain good tension doing this.
OK, so it can do almost everything. What are you waiting for? Go get one! They're cheap, easy to fix and use the most common Singer bits: Class 66 bobbins, 15x1 needles, all common attachments, common bulbs and drive belts etc.
Now the $50 one:
Incidentally, I generally sell these machines for what I paid plus whatever it costs in fuel and car wear and tear. This makes for a very quick sale, very happy people and a lovely machine that will immediately see more service.
From the moment I used one, my eyes widened and I was deeply impressed with the ease with which it did its job.
Lately there seems to be a flood of them on eBay and Gumtree, and of the last two I got, the first (last Saturday) was free in a cabinet. It was, admittedly, seized and took about two hours solid work to clean and lubricate it, than another ten hours to get it moving properly! The foot controller was also faulty and didn't work at all. It took only an hour to fix and adjust this because I didn't disassemble the carbon pile (the wiring was the problem). I now make a point of always removing any capacitors in foot or knee controllers, and always checking and cleaning the motors. Cleaning them improves contact between the brushes and the armature, and results in a stronger motor.
The second machine was $50, and I didn't actually want this one, but in the picture with the machine was a very nice looking Swiss Zigzagger! It seems I was the first person to call: First of dozens according to the lady. She said she'd done research and they seem to sell for about $50. I told her about the Swiss ZZ and that it was probably the reason for its popularity. Got the machine, attachment and a buttonholer into the car and went home. She had admitted that she had never cleaned, oiled or serviced it and when it got stuck she just pulled out whatever was obviously in the way and kept going again! Needless to say it had an unusual amount of lint and dirt. Additionally, the motor's wiring, like most knee machines, was really stuffed. I carefully replaced the dangerous bits and repaired any damaged insulation. The Swizz ZZ was is very good condition, and all pattern cams were present in their original package. The buttonholer was seized up (I'd never seen one so stuck), and it took days of jiggling to loosen it up. Still not happy with it, so more work required there.
Before I post pictures, I have to suggest why 201s aren't more popular. It is a domestic machine that only does straight stitch. That's it, simply, these days people either want a domestic to do everything or an industrial straight stitcher. The 201 is not to be ignored, however. Add a good zigzagger and buttonholer (which the lady had) and you have a machine that can not only do a perfect stitch but everything else you'd expect. It won't, however, do free motion embroidery/darning very well. Apparently the horizontal bobbin makes it difficult for the machine to maintain good tension doing this.
OK, so it can do almost everything. What are you waiting for? Go get one! They're cheap, easy to fix and use the most common Singer bits: Class 66 bobbins, 15x1 needles, all common attachments, common bulbs and drive belts etc.
 | |
| The free one, aluminium machine from 1954 |
|
| ||||
|
|


Saturday, 9 November 2013
Tip Shop Overlocker
People have been asking me for ages now why I don't have an overlocker (Americans call it a 'serger'). The reason is not knowing how they worked and it would obviously raise the level of complexity of my life a bit. Not to mention that they're expensive: New ones were a lot more expensive than sewing machines, so I looked at second hand (eBay). Very expensive there too (more than $100).
The tip shop had one last week for $30. Here it is,
 It looks a bit plastic for me so I asked a friend and my partner (by SMS) if it was any good. My friend is my enabler, so she said yes. I picked it up and ooh... it passes the weight test. About 15kg. The tip shop guy plugged it in for me and tested it. Well, the motor went, so I was in.
The machine was made from 1981 in Japan (I just changed that from "France" - where did I get that from??). Funny, my new favourite machine is from 1891. Anyway, the manual was very clear (got it from singerco.com) so after a good clean I read how to thread it and set the tensions. Also disconnected the knife (the default behaviour is to cut the fabric as it gets fed through) because I'd like to do the cutting. EDIT: Re-enabled the knife - Oh, so handy!
Test fabric was denim and the results were a lovely chain around the edge. Might not use it for every garment but it's a good thing to have if it's needed.
The tip shop had one last week for $30. Here it is,

The machine was made from 1981 in Japan (I just changed that from "France" - where did I get that from??). Funny, my new favourite machine is from 1891. Anyway, the manual was very clear (got it from singerco.com) so after a good clean I read how to thread it and set the tensions. Also disconnected the knife (the default behaviour is to cut the fabric as it gets fed through) because I'd like to do the cutting. EDIT: Re-enabled the knife - Oh, so handy!
Test fabric was denim and the results were a lovely chain around the edge. Might not use it for every garment but it's a good thing to have if it's needed.
Embroidery on the 320k
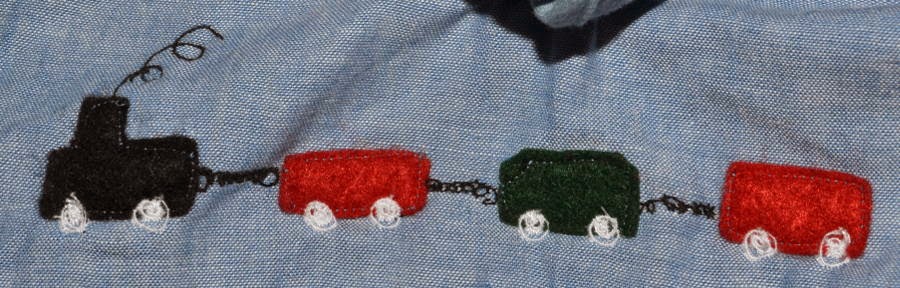
I made a romper suit for my niece's son the other day from a 1950s pattern. The instructions were bloody awful (confusing and ambiguous) but there was supposed to be a train transfer in the packet. Well, it was second hand, so it wasn't there. I traced the pieces (train and carriages) in coloured felt and embroidery was the only way to do the smoke, wheels and linkages. Here's how it turned out:
 The 320k came with a darning/embroidery foot and an embroidery hoop.They look like this:
 The hoop is supposed to keep the fabric tight but I couldn't get it on half the time due to stitching, folding etc which of course are far more common on little kids' clothing. So, here is how you do it without the hoop: Pull the fabric tight. Then the foot was the only special item needed.
Cover the feed dogs, attach the special foot, hold the fabric tight and move the fabric where you want the stitches to go. The result isn't too bad for a first attempt and I can see many places this can be used (practically anything can be personalised now!)

Cover the feed dogs, attach the special foot, hold the fabric tight and move the fabric where you want the stitches to go. The result isn't too bad for a first attempt and I can see many places this can be used (practically anything can be personalised now!)
Friday, 8 November 2013
A "new" machine
On Gumtree a week ago there was an ad for a fiddle base VS2 for $150! How couldn't I buy it?
So, picked it up Saturday morning and by the afternoon it was at home:
 Isn't she lovely? Came with the original coffin top too:
 I love this machine. I wasn't able to use it until Wednesday but when I did, I tried out a 1940s buttonholer:
 Now there's no reason the swiss zigzagger won't work on this machine. 1891, vibrating shuttle, will probably work with any attachment that works on a 66/99/201/221 or 222 so I'm keen to make something on it.
So, picked it up Saturday morning and by the afternoon it was at home:


Wednesday, 23 October 2013
A few manuals
It's one of those things that bothers me: People sell downloads of sewing machine manuals, yet they don't own the copyright. You might think it's still good value and convenient for you to have a printable copy but it annoys the hell out of me. If you didn't write it, you shouldn't be making money from it.
Here are two sewing machine manuals I Googled and found really difficult to locate. These are both scanned manuals that I scanned myself.
Please don't attempt to sell it. Click the link, the pictures are just pictures.
Necchi Supernova 2 *updated because ubuntu one is shutting down

Pinnock Sewmaster

Sunday, 20 October 2013
Goodbye to the old, hello to the new
No, I'm not going plastic on you, good people, but the lounge room had started looking like a warehouse, with boxes stacked on cabinets and it made actual sewing (yes I still do that) really difficult. So, what should I do? Buy another machine in a cabinet of course! Two or three weeks ago (on Sunday night) someone had put an ad for a six drawer Singer cabinet in need of restoration on Gumtree for $50. Well, it looked OK in the ad, and as long as there's nothing missing I'm up for it. Yes it's shabby and yes I have no room. It lived in the back of the car for a few days. It took only a few days to get rid of the two cabinets that lived in my lounge room. My beloved 319k in lovingly restored 1960 cabinet and a model 66, which I had swapped the presser bar with a later 66 to fit side clamping feet. This brings me to what a PITA the back clamping 66 is.
The story of the back clamping goes back a bit over 100 years. I read that Singer thought it a pretty nifty idea to have the 66 as a back clamper just after they had bought the Wheeler and Wilson factory in the U.S. seeing as that's what they used.
It was a disaster, of course, and meant that the 66 had to use feet that were different to all other models, and their customers indicated their unhappiness with the back clamp. Around 1922 Singer caved in to the pressure and made all future 66s side clampers, making them compatible with, well, everything.
So every time I get a 66 it seems to be a back clamper. When the six drawer car crisis happened, I hastily converted the back clamper to use the only side clamp version I had, advertised it for a low price and of course it sold quickly. So, got the six drawer cabinet in, looked at the machine inside and it was, you guessed it, a Singer 66 back clamper! It did come with a couple of back clamp feet (which is unusual) but I'm still pretty unhappy about it.
Here's a summary of movements for the past month or so:
Out
Singer 221k featherweight (centennial, manufactured 1950)
Singer 66k in treadle cabinet (1922 - only just a back clamper!)
Singer 319k in 1960 model cabinet.
All of these seem to have gone to the right people. They were all going to see further use as sewing machines. Decisions on what had to go weren't difficult. The 319k is in a cabinet, and I have a 320k that's also in the lounge room. I did keep the cams from the 319, though. Can't understand why the 320k didn't have them, or the darning plate.
OK, now this stuff I have to rely on my memory for, because there are usually so many. In
Singer 201k treadle, original deco treadle cabinet (1946)
Singer 66k treadle, original six drawer treadle cabinet (1912)
Singer swiss zigzag attachment
Singer attachment lot (incl two more of the above, plus two buttonholers). Not arrived yet.
Singer green button hole attachment (for low shank machines, uses cams for different types of button holes) - this has not arrived yet, more than a week after I paid for it. Not happy.
Don't have a pic of the swiss zigzagger (Google it - plenty of pictures around). It has a built-in walking foot and originally came with pattern cams (I got one out of the ten), which makes it highly desirable for a straight sewing machine like a featherweight, a 201 or a 66.
The story of the back clamping goes back a bit over 100 years. I read that Singer thought it a pretty nifty idea to have the 66 as a back clamper just after they had bought the Wheeler and Wilson factory in the U.S. seeing as that's what they used.
It was a disaster, of course, and meant that the 66 had to use feet that were different to all other models, and their customers indicated their unhappiness with the back clamp. Around 1922 Singer caved in to the pressure and made all future 66s side clampers, making them compatible with, well, everything.
So every time I get a 66 it seems to be a back clamper. When the six drawer car crisis happened, I hastily converted the back clamper to use the only side clamp version I had, advertised it for a low price and of course it sold quickly. So, got the six drawer cabinet in, looked at the machine inside and it was, you guessed it, a Singer 66 back clamper! It did come with a couple of back clamp feet (which is unusual) but I'm still pretty unhappy about it.
Here's a summary of movements for the past month or so:
Out
Singer 221k featherweight (centennial, manufactured 1950)
Singer 66k in treadle cabinet (1922 - only just a back clamper!)
Singer 319k in 1960 model cabinet.
All of these seem to have gone to the right people. They were all going to see further use as sewing machines. Decisions on what had to go weren't difficult. The 319k is in a cabinet, and I have a 320k that's also in the lounge room. I did keep the cams from the 319, though. Can't understand why the 320k didn't have them, or the darning plate.
OK, now this stuff I have to rely on my memory for, because there are usually so many. In
Singer 201k treadle, original deco treadle cabinet (1946)
Singer 66k treadle, original six drawer treadle cabinet (1912)
Singer swiss zigzag attachment
Singer attachment lot (incl two more of the above, plus two buttonholers). Not arrived yet.
Singer green button hole attachment (for low shank machines, uses cams for different types of button holes) - this has not arrived yet, more than a week after I paid for it. Not happy.
 | ||
| Out: 66k treadle |
 |
| Out: 221k Featherweight |
 |
| Out: the 319k |
 |
| In: The 66 - Did I mention it's a redeye? |
 |
| In: The redeye's home. The top needs new veneer |
Wednesday, 18 September 2013
Finished a dress, made with 201s and got two more machines
Can't say 201k, because the machine I started it with was a 201p (the tan one). Used the 319k for zigzag finishing seams and putting in the hook.
Here's the dress:
 It should fit her, but she lives on the other side of the planet so it might be a while before I get feedback.
 Here's the machine I used to finish it. The knee lever was really hard to get used to. I kept accidentally knocking the lever and sewing the thread into a knot.
The most important thing I discovered with this project was how to pre-finish a seam: Cut the fabric out using pinking shears! If you cut it the right size, the seam edges are pre-finished and no ZZ will be necessary.
Being unable to control my sewing machine addiction meant that since last week I bought two more machines. The first was another 319k but with a free arm. It's called a 320k but identical except for the removable bed. This feature made it horrendously expensive to produce apparently, so they didn't make that many of them.
The second was a Singer 401g (I think). It was on eBay for a while and nobody bid on it. It was re-listed at the same price so I bought it. I haven't picked it up yet but am quite excited. Here are the new ones:
There are a few problems with these two machines, being that the first one can't go into a cabinet because of the removable bed, so I'll have to sell my beautiful 319k in its cabinet. Good news is that the 401g can be treadled, so I can swap the 319k with a treadle cabinet (and free up some shed space).
Here's the dress:


The most important thing I discovered with this project was how to pre-finish a seam: Cut the fabric out using pinking shears! If you cut it the right size, the seam edges are pre-finished and no ZZ will be necessary.
Being unable to control my sewing machine addiction meant that since last week I bought two more machines. The first was another 319k but with a free arm. It's called a 320k but identical except for the removable bed. This feature made it horrendously expensive to produce apparently, so they didn't make that many of them.
The second was a Singer 401g (I think). It was on eBay for a while and nobody bid on it. It was re-listed at the same price so I bought it. I haven't picked it up yet but am quite excited. Here are the new ones:
 |
| Quite rare Singer 320k2 |
 |
| Singer 401g made in Germany |
Tuesday, 10 September 2013
new machines
OK, I've been accumulating some new ones. Got a 221k then a 222k, a Necchi Supernova, two 201ks and a model 66 in the past month or so. I've sold a few to make some room, but mostly just re-organised the shed so more will fit (I think I'm getting away with it. No, really). The supernova is said to be a potential time sink, so it's going to have to wait until the school holidays when I'll have a little more time to get caught up.
I think I've fallen for the 201s. Absolutely brilliant, smooth machines they are. Alex Askaroff said the earlier ones have the edge purely because of their massive weight (they can sew faster or some such insanity). The stitch is amazing and fuss-free. I'm going to try out sewing through several layers of denim, just to be convinced it can do it.
Here's a small assortment of new ones:


fixing a bakelite foot or knee controller
I bought another 201k on the weekend. It's aluminium and a knee controlled beast. Just couldn't resist it for $29. Pretty sure the guy who sold it to me was lying when he said he didn't know how to use it, but the motor ran at full speed as soon as the switch was flicked. This is caused by the capacitors shorting out. The capacitors were used to prevent any interference from the motor affecting things like TV sets and radios. These days they're not really necessary since most devices have supression built in. Both foot and knee controllers have the same bits inside so instructions are the same.
So, just remove the four screws holding the base on, take the capacitors out like I did and your machine should be back to working. If yours is a knee controller, remove it from the case first. It's obvious how to do this.

So, just remove the four screws holding the base on, take the capacitors out like I did and your machine should be back to working. If yours is a knee controller, remove it from the case first. It's obvious how to do this.

Fixing a Sewing Machine motor
I bought a treadle cabinet last week on ebay. It cost $10.50 and the picture of the machine inside was corrupted during upload so it was a mystery. When I picked it up, the cabinet was missing its treadle iron - arggghh! OK, the machine... hmm.. black and gold, apparently in mint condition, full sized. It was an early 201k! This cast iron beast was more than enough to make it worthwhile. I was expecting a model 66 and instead got the best domestic Singer ever made in mint condition.
On getting it home I cleaned it up. Major dust under the feed dogs as usual. Gave it tri-flow all round. Next problem is that of drive. I had a spare singer motor and light in the shed so out they came. The motor was really weak and sparks were lighting the place up like the proverbial Christmas tree. The problem is caused by carbon, oil and dust building up around the armature, where the brushes contact it. Singer motors are made so you can remove the brushes without separating the motor. There are two screws holding two small pieces of bakelite. Take these off and the rectangular brass tubes can be removed. Remove one of these at a time. My mechanic (dad) told me that even putting them back on opposite sides can reduce the performance of the motor. Clean the brush and the armature. I used methylated spirit, which seems to clean it well. When you're happy with it, put the brush back, screw its bakelite cap back on and clean the other brush.
Put it all together and test. Mine was a lot faster and way stronger than before.
Here's the machine because I know you're curious:
 She was born on 10th December 1936. My mum was very happy that this lady shares her year of birth, although she may well weigh more than mum (not really but she's very heavy).
On getting it home I cleaned it up. Major dust under the feed dogs as usual. Gave it tri-flow all round. Next problem is that of drive. I had a spare singer motor and light in the shed so out they came. The motor was really weak and sparks were lighting the place up like the proverbial Christmas tree. The problem is caused by carbon, oil and dust building up around the armature, where the brushes contact it. Singer motors are made so you can remove the brushes without separating the motor. There are two screws holding two small pieces of bakelite. Take these off and the rectangular brass tubes can be removed. Remove one of these at a time. My mechanic (dad) told me that even putting them back on opposite sides can reduce the performance of the motor. Clean the brush and the armature. I used methylated spirit, which seems to clean it well. When you're happy with it, put the brush back, screw its bakelite cap back on and clean the other brush.
Put it all together and test. Mine was a lot faster and way stronger than before.
Here's the machine because I know you're curious:

Monday, 12 August 2013
Best domestic machine ever?
I've fallen in love. About six months ago I bought a brown 1950s Singer 201, in mint condition.
It sat in the shed for, well, six months. Got it out when I was having trouble several layers of sewing denim (the 66 couldn't handle it easily). It went through it like a hot knife through butter. Afterwards, I imagined it saying "so what else ya got" in a Brooklyn accent. This thing is tough.
Last weekend I had no hesitation getting it out again. Someone I know had some blouses made by a sample machinist, who charged the Earth, but refused to finish with buttons and buttonholes! The buttons were easy: The 319k is made for button sewing. Looked at the 319 instruction book for button holes too. Yes it can do them but it's all very manual. I pulled out my vintage buttonholer, attached it to the 201 and started practising. The combination is just about unbeatable. Buttonholers are very cheap but sooo sophisticated. You can do a buttonhole on any straight stitch machine. How? The 'holer grabs the fabric and moves it, keeping the needle moving straight up and down. Instructions tell you to keep it slow. Hmmm... why's that? I went fast and the heavy fabric dragging on the needle pulled it far enough from its normal path that it went down on the plate and broke. Well, that's why!
So, I don't have any pictures, but here's a link to a demonstration by a guy in NYC, Peter Lappin.
I did take pics of doing the button on the 319, though. Very quick. Bummer (or otherwise) thatone machine can't do everything, isn't it? Could probably attach the buttonholer to the 319, but that'd be less fun, wouldn't it?
Saturday, 22 June 2013
Might as well face the facts
I'm far more interested in collecting and fixing sewing machines than I am with sewing. This is not to say that I'm not interested in sewing, but the machines make my heart race.
So I was strolling lazily through ebay a few days ago and someone had a really nice looking machine from the 1920s up there. He said "Antique Singer Sewing Machine Head, Machine is seized, Electricals untested". The machine looked really nice (lotus) and the serial said it's a model 66 from 1924. No cabinet of course, and it came with a motor. Starting price was $15.
OK, what are the chances of anyone else bidding? Well, there was a chance even though it sounded pretty bad. I read the description: "Antique Singer Sewing Machine Head. Machine No. Y1657881. Machine is seized and has some rust, globe, bobbin and bobbin cover plate is missing. Electricals untested pedal attached. The drive belt is missing too". Yes, he's really sexing it up. Even better was that it finished at 10:05pm on a Wednesday night, was in Geelong and postage was listed (cheaply, IMO - it weighs quite a bit) as $26.50. Nobody else placed a bid, surprisingly :-) Picked it up today and it looked like this:
 He was right, it really was seized. I tried oil and a little persuasive rocking, no dice. Decided after taking half the mechanicals off that the Internet would be a good resource here. Hmm, yes, a good WD40 soaking followed by a good wipe and a good lot of oil. The WD40 didn't free it up! I disconnected everything the hand crank connected bit by bit until I found the culprit: The needle bar was completely rusted to its mounting. Tapped a screwdriver directly downwards on the top and it moved. Gently placed the pliers on it and moved it round (it was disconnected completely at the top). The bar was covered in orange WD40 now and it seemed no amount of wiping was going to remove it. Eventually, though it did.
Re-connected everything and plugged it in (I had disassembled and reassembled the motor too) and the motor worked. It was so pathetic (probably because I'd removed the brushes) that I decided to treadle it. Into the cabinet it went, and I even had a new belt for just such an occasion :-) She's probably not sewn a stitch in 50 years, but she did several hundred this evening. Yep, she's a beauty, and I'm just going to apply some shellac to protect the decals.
So I was strolling lazily through ebay a few days ago and someone had a really nice looking machine from the 1920s up there. He said "Antique Singer Sewing Machine Head, Machine is seized, Electricals untested". The machine looked really nice (lotus) and the serial said it's a model 66 from 1924. No cabinet of course, and it came with a motor. Starting price was $15.
OK, what are the chances of anyone else bidding? Well, there was a chance even though it sounded pretty bad. I read the description: "Antique Singer Sewing Machine Head. Machine No. Y1657881. Machine is seized and has some rust, globe, bobbin and bobbin cover plate is missing. Electricals untested pedal attached. The drive belt is missing too". Yes, he's really sexing it up. Even better was that it finished at 10:05pm on a Wednesday night, was in Geelong and postage was listed (cheaply, IMO - it weighs quite a bit) as $26.50. Nobody else placed a bid, surprisingly :-) Picked it up today and it looked like this:

Re-connected everything and plugged it in (I had disassembled and reassembled the motor too) and the motor worked. It was so pathetic (probably because I'd removed the brushes) that I decided to treadle it. Into the cabinet it went, and I even had a new belt for just such an occasion :-) She's probably not sewn a stitch in 50 years, but she did several hundred this evening. Yep, she's a beauty, and I'm just going to apply some shellac to protect the decals.
|
|


Monday, 10 June 2013
DIY Vintage Machine Japanning 2
 |
| About to get hot |
 |
| After the oven, not very smooth |
So I stripped it all again and painted it with enamel. Well, I have to say that the enamel's biggest downfall is that it's so damned thin! The Japan from the methylated 78 was very thick and was indeed quite suitable for the job but it was a bit lumpy. In retrospect, I should have just filtered it through a stocking.
I think I'll probably have to make a mixture out of shellac and asphaltum and re-Japan the machine.
Damn, the "asphaltum" I ordered from Jacksons turned out to be lump rosin. I'll be sending it back of course (I assume they'll want back, since it costs twice as much as asphaltum), but it meant when I decided to redo the Japan, I used the dissolved record mix again. This time I practically poured it over the base of the machine. I'll leave it four or so days to dry (or longer if necessary), sand it back then fire it in the BBQ (after making a bit of room there, or turning it sideways) since I'll probably die if I use the kitchen again (from either fumes or being subsequently murdered). Haven't taken any photos of the new Japanned surface - it looks pretty much the same as the last time, only a bit smoother. This time I also mixed some Shellac into the mixture and filtered before pouring. Brushes must be used only within a few seconds of the pour or else you'll get definite brush strokes appearing and staying on the surface. Yes these can be removed later, but it's not easy, particularly after firing the machine, when the Japan is really quite hard. I'll also attempt to remove more of the mechanical components beforehand - it scared me when after it was last fired the machine was completely siezed. I've bought some tri-flow oil now in anticipation of this happening again.
OK, more later, but I'm convinced that the dissolved record will give the most accurate surface now. Alternative is to proceed with enamel, giving it about three or four cans worth, or about 30 or so coats to build up enough paint to exceed the depth of the casting marks. If the surface remains dull as it did the first time, I will shine it using more shellac, dissolved in metho and applied using a cotton cloth.
Friday, 31 May 2013
DIY Vintage Machine Japanning
The 1891 Singer, I decided, needed a lick of paint, particularly since the decals were almost gone.
What I discovered was that the stuff that's on there is not actually paint at all, but Japan, named from the country that made it famous. It's very much like enamel, but is made from shellac and lamp black. The latter is, I believe, just fine charcoal and the acceptable substitute is asphaltum. Asphaltum is available today, lamp black not as much. When the sewing machines were painted with this, they were (as with enamel) placed into an oven overnight, and this process repeated twice more. Is it any wonder sewing machines cost so much?
Anyway, I decided that instead of replacing the Japan with enamel, I'd have a go at the original finish. To this end, I decided to try an experiment: Japan made from a 1920s record. Assuming this will fail, I've ordered and received shellac flakes and asphaltum (from Jackson's art supplies in Perth). See Woodworking forum for the basis of my research.
The record was from the tip shop. When I told him what it was for he only charged 50 cents. Bargain! It takes almost a whole week to dissolve a record, so last weekend I smashed it all up and placed it in an ice cream container, like so:
 Pretty stupid to put it in this for two reasons:
1. What if metho also dissolves vinyl?
2. I'm supposed to shake it each day!
So, after covering it with cling film for a day or two and stirring very carefully, I transferred it into a clean, empty, dry morello cherry jar. Shook it at least once a day and now, six days later, it's very thick, smells like tar and about as painty as it's going to get.
Stripping the VS2
I stripped the "bright work" off, and the sewing machine looked like this:
 Applied some paint stripper, waited 15 minutes and washed it off. The tin suggested applying it 2-3mm thick but I didn't want it to eat my precious old lady, so it went on thin:
Still a lot of old Japan there, but the stripper meant it was thinner and easier to remove (although by no means easy). I used a scraper, wire drill attachment (essentially useless for removal but good for removing the newly formed rust) and sandpaper (don't use a machine on the curved surfaces or they won't be for long).
Eventually it all came off:
 This is also after cleaning with metho which got a lot more black stuff off. I kept wiping with clean cloth and metho until there was no more black stuff. Sent a photo to a friend who said it looks raw and industrial. Yes, it does now, but if I didn't coat her with something, she'd be orange by the day's end.
Also mentioned to my friend that I never thought I'd get excited by a naked old lady (122 years old, in fact). Another thought was a guilty one: This is porn to a sewing machine collector.
OK, enough humour. You'll probably notice I've removed a lot more stuff as I've gone along: It became obvious that if I have to bake this in the oven (or hooded barbecue - apparently the tar smell gets much worse once it gets hot and I do love my oven) I don't want anything to go with it if not necessary, so I took a lot more things off. It'll possibly be difficult to get them back on, since they include the shuttle race and work clamp, but I know I can do it.
First coat and she looks like this:
 I was very disappointed that it's so dull, but I had a look at the discussion pages again, and someone mentioned that it's dull and rough until it goes into the oven, so I'll wait until after firing to decide on its success. I will leave it to dry overnight then rub it with emery paper before giving it another coat. I will also add some boiled linseed oil to the mixture, as this was also mentioned to stop the Japan from becoming brittle. The linseed oil will add to the smell, too, so the BBQ's the prime contender for firing at this stage.
And that's as far as I've got. Will update when there's something else to report.
EDIT: Something else to report. I added boiled linseed oil, then gave it all a second coat:


 Yes it's looking rough, but as I mentioned I'm not expecting great things (like it even working) and the finish goes smooth once it's in the oven (BBQ).
I also found that it's so thick that it covers the oil holes (notice they're all gone). Will have to take to it with a small drill bit and carefully (by hand) scoop off the 'Japan'.
Will give it today to dry (it's cold and extremely wet in Melbourne right now), or until it's slightly tacky to the touch.
What I discovered was that the stuff that's on there is not actually paint at all, but Japan, named from the country that made it famous. It's very much like enamel, but is made from shellac and lamp black. The latter is, I believe, just fine charcoal and the acceptable substitute is asphaltum. Asphaltum is available today, lamp black not as much. When the sewing machines were painted with this, they were (as with enamel) placed into an oven overnight, and this process repeated twice more. Is it any wonder sewing machines cost so much?
Anyway, I decided that instead of replacing the Japan with enamel, I'd have a go at the original finish. To this end, I decided to try an experiment: Japan made from a 1920s record. Assuming this will fail, I've ordered and received shellac flakes and asphaltum (from Jackson's art supplies in Perth). See Woodworking forum for the basis of my research.
The record was from the tip shop. When I told him what it was for he only charged 50 cents. Bargain! It takes almost a whole week to dissolve a record, so last weekend I smashed it all up and placed it in an ice cream container, like so:

1. What if metho also dissolves vinyl?
2. I'm supposed to shake it each day!
So, after covering it with cling film for a day or two and stirring very carefully, I transferred it into a clean, empty, dry morello cherry jar. Shook it at least once a day and now, six days later, it's very thick, smells like tar and about as painty as it's going to get.
Stripping the VS2
I stripped the "bright work" off, and the sewing machine looked like this:

|
|


Eventually it all came off:

Also mentioned to my friend that I never thought I'd get excited by a naked old lady (122 years old, in fact). Another thought was a guilty one: This is porn to a sewing machine collector.
OK, enough humour. You'll probably notice I've removed a lot more stuff as I've gone along: It became obvious that if I have to bake this in the oven (or hooded barbecue - apparently the tar smell gets much worse once it gets hot and I do love my oven) I don't want anything to go with it if not necessary, so I took a lot more things off. It'll possibly be difficult to get them back on, since they include the shuttle race and work clamp, but I know I can do it.
First coat and she looks like this:

And that's as far as I've got. Will update when there's something else to report.
EDIT: Something else to report. I added boiled linseed oil, then gave it all a second coat:


I also found that it's so thick that it covers the oil holes (notice they're all gone). Will have to take to it with a small drill bit and carefully (by hand) scoop off the 'Japan'.
Will give it today to dry (it's cold and extremely wet in Melbourne right now), or until it's slightly tacky to the touch.
Sunday, 26 May 2013
A couple of new machines
It's getting a bit beyond a joke now. I've bought two more machines and was given one. They are:
1891 Singer VS-2 Fiddle Base.
1950s (serial number unlisted) Singer 227M, and
1950s (probably) Liberty (Japanese Singer 15K clone).
Liberty is here
 Best thing about it is that it's a hand crank machine. Thought that it might just fit the VS-2 but the mounting isn't there for the older one. Still, after lubrication it goes like a beauty. That said, just winding a bobbin was initially fun but quickly became exhausting.
The VS-2 is next
 As you can see the decals are almost non-existent. Also, that motor had to go. It was a conversion, probably in the 1950s, had no controller at all, and had no plug "for safety reasons". Does one really need anything more? Out it went, with all its accompaniments (brackets, belt). You can see that the original coffin top came with it, so I'd really like to restore this machine back to its original state. Kind of expensive, considering. The metal parts all need re-plating (in nickel), so I got rid of all the old stuff and polished it up. If it looks crappy later, I'll do it, but the cost is getting up there.
The 'paint' you see on these old machines is actually not paint at all, but "Japanning". This is a mixture of asphaltum, shellac and boiled linseed oil which is painted on then fired at about 140C for several hours. I think this machine deserves a new covering after 122 years of service.
So, I was on the look out for a treadle table for it, and found one. $50 later and I had a 1950s table. OK, not time matched, but it'll work. It also came with a Singer 227M. Straight stitch machine with no booklet, attachments or anything else (deceased estate, the family threw a lot of stuff out, as they do). The machine is quite a good one, but with no ZZ plate or attachment, or light, motor etc it's pretty useless. Anyway, have to go, but I'm going to melt an old 78 record in methylated spirit and add some boiled linseed oil (the records consist mainly of asphaltum and shellac), a common practice apparently and onto the hooded BBQ it goes for three hours. Let you know how it turns out.
EDIT: Here's the 227M:

1891 Singer VS-2 Fiddle Base.
1950s (serial number unlisted) Singer 227M, and
1950s (probably) Liberty (Japanese Singer 15K clone).
Liberty is here

The VS-2 is next

The 'paint' you see on these old machines is actually not paint at all, but "Japanning". This is a mixture of asphaltum, shellac and boiled linseed oil which is painted on then fired at about 140C for several hours. I think this machine deserves a new covering after 122 years of service.
So, I was on the look out for a treadle table for it, and found one. $50 later and I had a 1950s table. OK, not time matched, but it'll work. It also came with a Singer 227M. Straight stitch machine with no booklet, attachments or anything else (deceased estate, the family threw a lot of stuff out, as they do). The machine is quite a good one, but with no ZZ plate or attachment, or light, motor etc it's pretty useless. Anyway, have to go, but I'm going to melt an old 78 record in methylated spirit and add some boiled linseed oil (the records consist mainly of asphaltum and shellac), a common practice apparently and onto the hooded BBQ it goes for three hours. Let you know how it turns out.
EDIT: Here's the 227M:

Monday, 22 April 2013
Sewing machine cabinet quick restore
My Singer 319K came in a cute little 1960s cabinet. However, the cabinet had seen better days. It looked like this:
 I decided during the holidays that this little cutie deserved a new lease on life.
Sanding it down seemed like a lot of work, and a scraper usually achieves the same result only much quicker. I used a scraper (I call it a wallpaper scraper), in fact this one:
 You can clearly see the state of the cabinet lid. The top of the lid copped the worst of the sun, being on top of course. It was so bad that a lot of the varnish was gone completely, leaving large patches of exposed wood. The remaining varnish must have felt a bit lonely or even suicidal, since it barely held to the wood at all. I scraped it all onto the floor, vacuumed the floor, then unscrewed the lid to take it outside (it was obvious even to me that doing this inside was just unnecessarily messy).
A quick trip to the hardware shop and I came back with a brilliant Aussie varnish, Cabot's Cabothane Clear. Bit expensive as were all the urethane finishes. When the varnish was off, it was sanded using a machine, filled with liquid wood then manually sanded all over with some fine steel wool (00).
The urethane requires three coats, and here's how it goes:
First coat goes on the bare wood. You have to do this inside in a non-dusty environment, unfortunately (it smells pretty strong). If not you'll have dust, insects, pollen etc. under your beautiful polish. After six hours, rub it lightly with some 300 emery (dry), put the second coat on, wait another six hours, rub lightly, third coat, leave for 24 hours, rub lightly (I used steel wool grade 0000) and use car or furniture wax to leave a deep gloss.
Here is how it ended up:
I put two coats on the underside of the lid, and three on the top of the cabinet:
Didn't really want that deep gloss for the underside. Seemed like a bit of a waste of effort and it didn't really get much sun exposure.
I still have to do the rest of it, but that was probably the larger amount of work. The legs are only just holding the varnish, too, so it shouldn't take much to get them looking like new (albeit somewhat rustic) again. It will possibly have to wait until the end of term 2.
Most of the time went into waiting for the stuff to dry, so this was what I'd class as an easy job, or "low hanging fruit".
The lid's underside took a lot more work to remove the original stuff that the top (it wasn't as damaged). Also, be careful with your scraper: It's not that difficult to scrape the wood off if it's soft.

Sanding it down seemed like a lot of work, and a scraper usually achieves the same result only much quicker. I used a scraper (I call it a wallpaper scraper), in fact this one:

 |
| Bare wood, before filling |
 |
| Steel wool, about to rub down the filler and bare wood |
First coat goes on the bare wood. You have to do this inside in a non-dusty environment, unfortunately (it smells pretty strong). If not you'll have dust, insects, pollen etc. under your beautiful polish. After six hours, rub it lightly with some 300 emery (dry), put the second coat on, wait another six hours, rub lightly, third coat, leave for 24 hours, rub lightly (I used steel wool grade 0000) and use car or furniture wax to leave a deep gloss.
Here is how it ended up:
 |
| Top of the lid is now as beautiful as the machine it contains |
|
|


I still have to do the rest of it, but that was probably the larger amount of work. The legs are only just holding the varnish, too, so it shouldn't take much to get them looking like new (albeit somewhat rustic) again. It will possibly have to wait until the end of term 2.
Most of the time went into waiting for the stuff to dry, so this was what I'd class as an easy job, or "low hanging fruit".
The lid's underside took a lot more work to remove the original stuff that the top (it wasn't as damaged). Also, be careful with your scraper: It's not that difficult to scrape the wood off if it's soft.
Subscribe to:
Posts (Atom)