Showing posts with label 319K. Show all posts

Sunday, 31 May 2015

Demonstrating some attachments using a Singer 319K

The Singer 319K Swing needle machine

I have a soft spot for this machine. It was the first vintage Singer I ever bought. It had a major limitation that I managed to overcome. The limitation was the fact it needed a special needle.

Make it use a normal domestic needle

To overcome this, I had a very experienced sewing machine expert modify the bobbin case to make sure it could safely use normal needles. The 206x13 size is only made in normal point sizes 80 and 90 these days which limits the machine to about 10% of its capabilities. Additionally the twin needles haven't been made for decades and are almost impossible to get.

So, you modify the bobbin and your machine can now do 15x1s. This means you can now sew jeans, canvas, stretchy fabrics, silk. OMG! Hold on, that's not the whole story. You need to read your manual. Yes, yes, I know, only wimps read manuals. In that case I'm a card carrying wimp, but I bet I can do more with my 319 than you can (I'm virtually sticking out my tongue at you).

This one made in 1960, behold the mighty 319K
Below is the last garment I've made (finished it on Friday). About 99% of the work was done on the 319K. The 1% was when I stitched the ribbing to the cuffs. I used a free arm Bernina record because it's a bit easier and I had one right here.
Reversible bomber jacket

Buttonholes

The buttonholes on this jacket were made using a Singer buttonholer. You can do without but it's such a huge pain that you wouldn't want to. Besides, old buttonholers are very cheap on that auction site we all know. You'd pay about $15 for one that doesn't use templates or $30 for the template one. I use the latter, because if you try swapping to a buttonhole size you did earlier it's impossible with the non-template one. Consistency is what I look for and the template buttonholer achieves this. Always use the cover plate rather than dropping the feed, because the plate (being higher) increases the foot pressure so it will hold the fabric much better.

Buttons

The buttons were sewn on with the 319K. You do this for a quick and consistent result. The machine does a far better job than I ever could.
Every zig-zag machine probably comes with a button foot, which is made so you can see more of the button.
Close-up of finished buttons
Here is the button foot with button in place:
Put a needle F-R between the holes
Now, a couple of things to note. Before starting to stitch, lower the feed dog. On the 319 you do this by tilting back the machine as though you were changing the bobbin. You'll see a big thumb screw near the bobbin area. Unscrew it all the way until it gets tight again. You will notice that the feed dog has now dropped and will not smash your button when you start sewing (yes I've done it).
When sewing a button, you'll get a better result if you place a needle front to back between the two holes before starting to stitch it (which I haven't done in this picture). Reason is that after removing the needle, the button will be loose, even though there are many stitches holding it in place. You take all the threads so they are between the fabric and button (use a hand needle if necessary) and in pairs, wind them in opposite directions around the button five times then tie them together. You will have made a shank for your buttons. If you don't do this, the fastened button will pull at the fabric it's closing and this looks pretty bad. The thicker the fabric, the longer the thread you need to leave and of course you need to wind it a few more times.

Roll hem

Ever read in a sewing pattern's instructions "turn 1/4" toward wrong side twice"? Before I discovered the roll hem foot, I was at the ironing board with a ruler struggling to measure and press. My partner told me this is what you have to do, but after reading the manual I learned about this amazing foot.
fabric turned at the back to show the results
It's included with every sewing machine sold since the 1880s and is simple to use. I'd recommend practising for about 30 minutes before going into production. You have to control the feed so the edge and the main parts are even. You can see the result here: Perfectly straight line and consistent stitch.

Engaging the Zig-zag

The zig-zag is engaged by lifting the lever that has a picture of a zig-zag on it. You set the bight (width of zig-zag) and away you go. Very easy indeed.
If you select bight of zero you will get a straight stitch (with any pattern disc) which is obvious if you think about it. Any pattern you select is a straight stitch if the bight is zero.
Pattern relies on bight being more than zero

Overcasting

This is like overlocking/serging except it uses a simple zig-zag right at the edge. Rather than guess, or try some other way of making it straight, use the all purpose foot.
This is in the manual. If you don't have an overlocker, overcasting will finish the seam just as well. Here is the relevant page from the book:
This manual can be DLd free from Singer's web site
This means that you don't really need an overlocker. Hey, you just saved a small fortune!

The Ruffler

How many times have you seen these things and thought it looked like a medieval torture instrument? Never? Maybe it's just me then. Well the ruffler is an excellent tool for ruffling and for creating pleats.
Note plate at top right and screw underneath
The plate at the top is set to 6 here. This means the ruffler will only fold once every six stitches. Stitch length is still controlled by the usual means. The throw of the ruffler (how much fabric it pulls) is controlled by the screw. Some rufflers will have the adjusting screw on top.
You can also set the top plate to 12, meaning it will throw every 12 stitches. Set to 1, every stitch will ruffle, so you better make sure the throw is fairly short or you'll end up with a pirate shirt!

Interfacing

You might notice three pictures above that this fabric has interfacing on part of it. This is because I wanted to show you some embroidery. These days it's referred to as fusing, which is probably a portmanteau of fusible interfacing, fusible meaning it will fuse when you heat it enough to melt the glue. I doubt you can even buy the non-fusible variety these days, I know I've never seen it.
Application is extremely easy. Cut it and place when you want on the wrong side of your fabric. Press the iron at the appropriate heat level (I make it as hot as possible) and put a little pressure on the iron for ten seconds on each part of the fusing. After you do the whole section, it should be fused. If not, do it again. It's a pain when this stuff comes off.

Seam Guide

I haven't bothered with a picture of this, but Lizzie Lenard has a picture of one.
Screw it to the bed of your machine, adjusting to the width of your choice and use it to ensure you sew straight Lizzie's tip of putting felt under it is a good one and will prevent damage to your machine's paint.
Machines made in the latter half of the 20th century (like the 319K) also usually have a needle plate with lines marked 3 to 8. These are eighths of an inch. Also, at central position and with the general purpose foot, the distance between the needle and right side of the foot is exactly 1/4" (2/8) on the 319K (the 201 has this feature too). Very useful, as I frequently need that measurement. For those who are more metrically inclined 1/4" is 6mm, 3/8" is 1cm, 5/8" is 1.5cm. I'm not trying to be smart there. I live in a metric country but learned to sew using pre-metric patterns and pre-metric machines. Metric doesn't come into my sewing very often at all.

Machine Embroidery

First of all I was disappointed last week when I discovered that I couldn't do free motion embroidery successfully on my 319K. I'm pretty sure I tried it on the 320K2 last year successfully and the 320K2 comes with a darning hoop and hopping foot. The only difference between those two models is in the bobbin area, since the 320 has to squeeze everything into that little free arm (no room for droppable feed dog - boo!) but the 320 can do FME, so swings and roundabouts, really. The 319 can't FME but its feed dog drops. Here's what happened when I tried to FME on the 319K: I guided the fabric from front to back (like in regular sewing) and it works but as soon as I moved it sideways or back to front, it won't pick up the bobbin thread and I got skipped stitches. I could just limit myself to going front to back, but I might as well just pop the foot back on and have better control. This is what I did for the self portrait below.
UPDATE: FME does actually work on the 319K. I discovered that this particular machine had an issue where the needle wasn't near enough to the hook to pick up the thread when it was moving any direction other than front to back, and after adjustment, she now does a lovely embroidery stitch.
In the manual it suggests using the stitch pattern, or "fashion" discs (A.K.A. cams) to make pictures. I'd suggest just using the zig-zag and guiding the fabric around the picture you drew (in pencil).
The reason you need to fuse it is that the stitches tend to pull the fabric together during the zig-zag stitch, so it also helps if you reduce the thread tension (I set it to 2. Normally it's at 3.5). You might have to play with it to get it right, so again, use a test piece first.
I just drew a smiley face and traced around it:
Yes I actually do look like this, except my eyes are larger and further down.
So, are you getting the most out of your machine? I love attachments and special feet.The geniuses that invented them didn't do so because they're good gimmicks to sell machines. They were made to save you time and allow you to produce a more consistent result. Learn to use them, don't just look at them, and you'll wonder how you ever sewed without them.

Friday, 15 May 2015

Embroidery on old sewing machines

Before you start

Make sure your test fabric has been backed with interfacing. You will get a much better result from doing this and even the 1911 book recommends a backing fabric.

Using your automatic patterns

I had a look at doing this a while ago on my 320K2 and it seemed to do a really nice job. Things I learned about embroidering on 1950s machines are:
1. Zig-zag is useful when creating a really thick line.
2. So is built-in patterns and pattern cams.
3. So is your machine's ability to do a really short stitch.
4. If you don't have a machine with cams, you really only need zig-zag. You can move the lever as it sews to make just about any pattern.

I have to say that my Pfaffs have been extraordinarily good at all of this, particularly at achieving a very small and accurate stitch length. The idea with all of this is to use the machine to do most of the work. Break the picture you want to make into patterns covered by your machine's cams then just go for it.

The Necchi Supernova is really unbelievably good at patterns, since it will go backwards to achieve the pattern you want. First time I saw the Necchi do this my jaw dropped. It was like an electronic machine, except totally mechanical and 60 years old. What a machine! I just have to fix mine and I'll be happier to experiment some more (transformer blew up).

Using free motion on a straight stitching machine

This needs to be explained first. Free motion refers to placing the work in an embroidery hoop, Removing your machine's presser foot so there isn't one there at all, and sewing slowly while moving the hoop to make the pattern in one hand while using the other hand to press down the fabric right next to the needle.
This technique is described in the Singer embroidery book of 1911 (no longer in copyright so go for it) and it specifically mentions models 66, 15 and 27. It's pretty much accepted that machines with drop in bobbins (the 66) are less satisfactory doing this due to the 90 degree turn the bobbin thread needs to make, leading to loose threads. I haven't experienced this at all and don't have a spare 66 to test, just quoting what I've read on various forums.
I tried this on a 319K (not a straight stitcher and a vertical bobbin machine) and the results were 'mixed'. Stitching in the normal direction worked beautifully, but when I attempted to go any other direction, the thread wouldn't catch. Here is the best I could do with the 319K (the word 'Mike'):
I had to turn the work so it was always sewing in the same direction.
Another problem I had was forgetting to put the presser bar lever down before sewing. The lack of a foot makes it easy to overlook, and if you do the bottom threads will be extremely loopy (because there's no tension at all on the top). Also on the 319, the feed dog was dropped.
The word 'Audrey' was done on my 1891 VS2 ('vibrating' bullet shuttle) and with this machine the feed dog doesn't drop so it needs to be covered (the feed dog interferes with the fabric movement). Any vintage buttonholer will have an appropriate plate, so screw this in place before starting.
I was surprised that the 1891 machine performed so much better than the 1950s vertical bobbin, but it definitely did, so I'll leave the green machine for automatic patterns and the VS2 for free motion work. The VS2 had no trouble at all with anything I tried and didn't skip a single stitch in any direction. I tested both of these machines by sewing a circle and the VS2 did it beautifully.

There are a lot of good instructions in the book, so if you like an older machine, this is for you. I'll be playing a lot more with it in the near future.

Monday, 8 September 2014

Singer 320K2 bobbin case mod

Don't you love a mod? Ah the '60s... No that's a different kind, but this one's more useful than stylish.

Here is the bobbin case after Nick Ciancio did his thing:

The arrows point to the bit he machined off. I asked him to explain the mod and he said that when there's a 15x1 needle inserted, there's no problem when straight stitching. When zig-zagging, however, there's a real danger of the needle hitting the bobbin case, and the removed section marks the point of impact. The longer 15x1 goes down an extra 2mm or so and removing this by making the "U" shape a little wider (see arrows) removes the possibility of impact.

I now have an extremely rare old machine that has a free arm and uses common 15x1 needles! Allowing a 15x1 needle to punch the metal out is a bad idea. Just Google for the result and you'll find pictures of destroyed cases.

I'm more than happy to recommend Nick to anyone in Melbourne who has a vintage machine. He's very friendly, can repair anything and really loves the old machines.

Oh and I should mention that in a comment on my last post I said that I was a little disappointed in the 320s stitch quality. Checked the needle height and it was a mm or two out, which had also put the timing out. Spent 20 minutes fixing it and she sews much better now.

Thursday, 6 March 2014

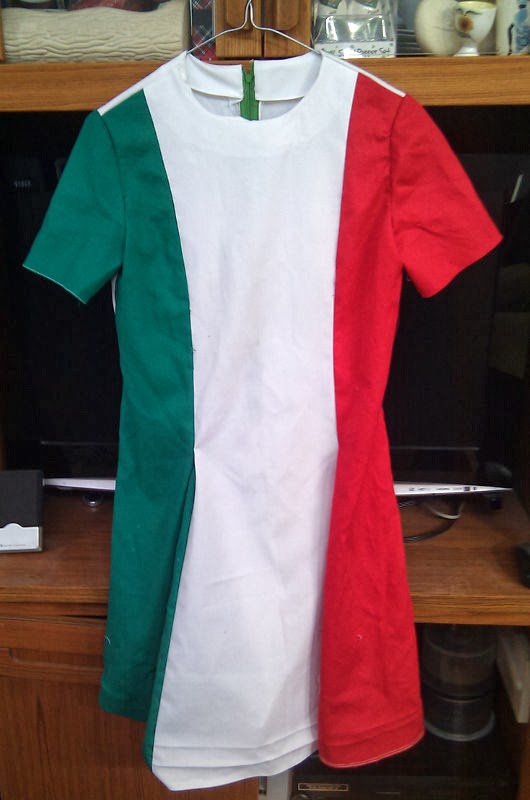
Italian day again, new dress. Fixing your colours.

My daughter's Italian day dress got ruined when I washed it. Yes, it was me. However, I hadn't expected the fabric not to be colourfast. According to the lady in Spotlight, none of the fabric they sell is! So, what do you do? According to most sources, brine (salt water) is the way to get the colour to stay in the fabric. I also read that if the fabric is silk vinegar is more appropriate. For some reason, I started getting cravings for fish and chips when reading about this.

So, carefully selected some red and some green drill then started the tests. Cut off a little red and dropped it into some water. Yes, the colour started haemorrhaging instantly. The green just as bad. Couple of litres of water and about 1/2 a cup of salt and lowered all of the red into it. A couple of hours later rinsed it and not much came out! Great stuff. Emptied it and repeated with the green.

So, with Simplicity 5945 (view 1), I simply replaced the side panels with a green on one side and a red on the other.


It was easy to make this and only took half a day to get this far:
Didn't have to ask for help either. Love it when this happens. Means I'm learning something or the pattern was ridiculously simple. Well, bit of both perhaps.
Here is the final  dress, modelled by the girl:

Same as the other one except for hemming and the bow.
The hemming was done on a Singer 319K I picked up free of charge two weeks ago. It was seized but a full weekend later and it's really very smooth and beautiful. Had to re-do the wiring too. Would have done the whole dress on this machine except a few days ago I won a 1960 401a on eBay for $13.45, also not working. Funny how easy it is to get these things working and it was hard to select one for this job, seeing as both were seemingly perfectly suited. The 401a got the most work done but when I tried blind hemming it, I needed instructions. The 320K2 manual is the only one I had at hand, so grabbed it. They were specifically for the 320/319 so I grabbed the 319 and got to work. I have to say, Singer designed some amazing machines in the late 1950s. Both of these machines were made around the same time, and they're both smooth and almost faultless. If I were making or hemming jeans, though, I'd go for a 201 or my 96K. The small motors aren't really up to it.

Sunday, 23 February 2014

Another freebie

On Gumtree the other day there was a 319K in a treadle cabinet. Strange thing, because although the cabinet is the same era the machine had its own original motor and light. So of course I separated them. Popped a 227 head into the cabinet with a new treadle belt and the 319K went into a Pfaff portable box.
The 319 is in absolutely amazing condition. Well it is now: I spent two whole days cleaning oiling and setting things, as the machine was pretty much in need of everything. The needle in there was not the correct 206x13 or even the commonly substituted 15x1, but a round shank industrial. Best not to mess about, so I didn't test it out. The power lead had insulation that was falling off so the plug wasn't going anywhere near the 240V outlet.
How she came to me
The service book is available from the yahoo group's files. Pictures aren't clear but the information is there. I went through everything possible, hence the two day restoration. It also came with a full set of discs.
Here's what it looks like now:
It took a really long time to get the bight width lever right. The problem was that it was seized up. I moved it a little with the pliers and cloth, but no amount of oil was going to get this thing moving properly. Taking it apart revealed a load of gunk just about everywhere. Took a long time to de-gunk it but it's now like new!
If you do this job on this model, I'd advise you don't do it without the service manual.

Sunday, 20 October 2013

Goodbye to the old, hello to the new

No, I'm not going plastic on you, good people, but the lounge room had started looking like a warehouse, with boxes stacked on cabinets and it made actual sewing (yes I still do that) really difficult. So, what should I do? Buy another machine in a cabinet of course! Two or three weeks ago (on Sunday night) someone had put an ad for a six drawer Singer cabinet in need of restoration on Gumtree for $50. Well, it looked OK in the ad, and as long as there's nothing missing I'm up for it. Yes it's shabby and yes I have no room. It lived in the back of the car for a few days. It took only a few days to get rid of the two cabinets that lived in my lounge room. My beloved 319k in lovingly restored 1960 cabinet and a model 66, which I had swapped the presser bar with a later 66 to fit side clamping feet. This brings me to what a PITA the back clamping 66 is.
The story of the back clamping goes back a bit over 100 years. I read that Singer thought it a pretty nifty idea to have the 66 as a back clamper just after they had bought the Wheeler and Wilson factory in the U.S. seeing as that's what they used.
It was a disaster, of course, and meant that the 66 had to use feet that were different to all other models, and their customers indicated their unhappiness with the back clamp. Around 1922 Singer caved in to the pressure and made all future 66s side clampers, making them compatible with, well, everything.
So every time I get a 66 it seems to be a back clamper. When the six drawer car crisis happened, I hastily converted the back clamper to use the only side clamp version I had, advertised it for a low price and of course it sold quickly. So, got the six drawer cabinet in, looked at the machine inside and it was, you guessed it, a Singer 66 back clamper! It did come with a couple of back clamp feet (which is unusual) but I'm still pretty unhappy about it.
Here's a summary of movements for the past month or so:
Out
Singer 221k featherweight (centennial, manufactured 1950)
Singer 66k in treadle cabinet (1922 - only just a back clamper!)
Singer 319k in 1960 model cabinet.

All of these seem to have gone to the right people. They were all going to see further use as sewing machines. Decisions on what had to go weren't difficult. The 319k is in a cabinet, and I have a 320k that's also in the lounge room. I did keep the cams from the 319, though. Can't understand why the 320k didn't have them, or the darning plate.

OK, now this stuff I have to rely on my memory for, because there are usually so many. In
Singer 201k treadle, original deco treadle cabinet (1946)
Singer 66k treadle, original six drawer treadle cabinet (1912)
Singer swiss zigzag attachment
Singer attachment lot (incl two more of the above, plus two buttonholers). Not arrived yet.
Singer green button hole attachment (for low shank machines, uses cams for different types of button holes) - this has not arrived yet, more than a week after I paid for it. Not happy.


Out: 66k treadle

Out: 221k Featherweight
Out: the 319k
In: The 66 - Did I mention it's a redeye?
In: The redeye's home. The top needs new veneer
Don't have a pic of the swiss zigzagger (Google it - plenty of pictures around). It has a built-in walking foot and originally came with pattern cams (I got one out of the ten), which makes it highly desirable for a straight sewing machine like a featherweight, a 201 or a 66.

Monday, 12 August 2013

Best domestic machine ever?

I've fallen in love. About six months ago I bought a brown 1950s Singer 201, in mint condition.
It sat in the shed for, well, six months. Got it out when I was having trouble several layers of sewing denim (the 66 couldn't handle it easily). It went through it like a hot knife through butter. Afterwards, I imagined it saying "so what else ya got" in a Brooklyn accent. This thing is tough.
Last weekend I had no hesitation getting it out again. Someone I know had some blouses made by a sample machinist, who charged the Earth, but refused to finish with buttons and buttonholes! The buttons were easy: The 319k is made for button sewing. Looked at the 319 instruction book for button holes too. Yes it can do them but it's all very manual. I pulled out my vintage buttonholer, attached it to the 201 and started practising. The combination is just about unbeatable. Buttonholers are very cheap but sooo sophisticated. You can do a buttonhole on any straight stitch machine. How? The 'holer grabs the fabric and moves it, keeping the needle moving straight up and down. Instructions tell you to keep it slow. Hmmm... why's that? I went fast and the heavy fabric dragging on the needle pulled it far enough from its normal path that it went down on the plate and broke. Well, that's why!
So, I don't have any pictures, but here's a link to a demonstration by a guy in NYC, Peter Lappin.
I did take pics of doing the button on the 319, though. Very quick. Bummer (or otherwise) thatone machine can't do everything, isn't it? Could probably attach the buttonholer to the 319, but that'd be less fun, wouldn't it?

Thursday, 4 April 2013

Sewing a holed button with your machine

I was told this can't be done, but according to the book that came with my 319K2 it's relatively easy. After a false start, I learned the art of putting on a button with a machine (I hate doing it manually).
The pre-requisite abilities of your machine are two:
1. Disengage the feed dogs. If they work as normal they'll move the button so the needle and button will both break. If you simply set the dogs to not feed (zero), they will still push the button up and will break the button. They must be disengaged and lowered. All of my machines have a height adjustment for the feed dogs and once lowered below the throat plate, your button will be safe.
2. Zig-zag stitching. Your machine must obviously be able to stitch from one side of the button to the other. If the button has four holes, a diagonal stitch is best, if your zig-zag will reach.

Here is the relevant page from the 319K manual:
319K Manual page 70
The instructions are the same for any machine, but disengaging the feed dogs is different for other machines. A friend of mine has a 1952 Phoenix 250 that has a very convenient lever on the front of the machine which lowers the dogs. I'm not sure if putting it to 0 stitch width is even necessary, but I did it anyway.

Slowly hand crank while adjusting the zig-zag width until you're certain the needle will go into both holes before engaging the motor. Note the instructions for adding a shank.

I'm confident, after 10 buttons or so. It saves me a load of time and produces a consistent result.

Wednesday, 27 March 2013

Dress and Blouse for the Little Woman

Robert Fritzlaff is a shining inspiration to me. He is a male designer of women's clothing in the 1950s and '60s (apparently a bit in the '70s too). He is also heterosexual. Yes, I know it shouldn't matter but it does. Sewing dresses for GF and daughter shouldn't be this enjoyable for a hetero male, but thanks to RF there is a precedent. Actually it's possibly not that uncommon. RFs taste in clothing is brilliant, too, as is his view of high fashion today ("garbage").
OK, off the soap box. I started making a dress yesterday:
Butterick 4061 (1965), Size 16T, Bust 36 "proportioned for teens" for my girlfriend, who left her teens even before I did, but we'll see how it fits when I'm finished. She gave me two more hurdles, being I must use an invisible zipper, and I must re-use a skirt section of an old dress she bought at a garage sale (sigh).
I forgot to scan or photograph the pattern cover but it looks like this:
I've been given the task of creating 'A'.
Cover tells me how much fabric I need (which I ignore, since I have to re-use old pieces). I also need interfacing for the facing.
One thing I found curious is that the pattern keeps mentioning the "Jumper". This is referring to the bodice. I kept looking for a jumper and for the bodice instructions, but they're one and the same!
So, cut out the fabric. I did just the bodice first, rather than all of the cutting at the start (means I don't have to use a hundred pins all at once). The first thing to do is to attach the interfacing to the facing - fusing is the name for the modern version. It must be pressed on and heated (iron or press), and is to be applied to the inside of the facing.
I cut out parts 1, 2, 3 and 4 in linen and 3 and 4 again in interfacing (Tip: Lay the interfacing on the linen and pattern pieces on top - saves cutting twice). Then trimmed 3/8" from the bottom of the interfacing and fused it to the wrong side of the linen.
Cutting the front and back. Notice dot triangle at fold
Facings. Only #3 has the dot triangles
The dot triangles are Butterick for "place at fabric fold", because the piece has to be continuous and double the size of the pattern piece. Different pattern vendors have different codes for this. Also, the two big dots on #4 must line up with the grain of the fabric (the same thread must go through them both). Not doing so with affect how the garment will move or how it stretches, so it's quite important.
Butterick has "easy steps" in following their pattern. Unfortunately, some of these are very complex.
Step 1: To make dart in BODICE FRONT, bring small dots together. Stitch, tapering to single dot, press down.
Seems straightforward, make the bust darts in the front piece (big piece with the dot triangle), then press down. But wait, there's more!
Trim 3/8" from lower edge of front interfacing. Baste to inside of bodice front as shown. Here we must depart from the instructions. In the '60s the interfacing had to be stitched. Now it doesn't. Since you have pressed it on, you need to ignore any mention of stitching it on without the facing. It is attached to the facing, and they should be treated as a single unit.
Sorry, I was not going to publish this in parts, but now will since I'm taking so damn long to hem the thing. Invisible hemming is the last step, and I badly misinterpreted the instructions in the Singer manual. Now I'm off work for a while so will post again shortly.

Friday, 8 March 2013

Appreciation of a good suit

Some people call my appreciation an obsession but it's not, or I'd buy more of them. Not sure of the number but around eighteen would be in the ball park. Vintage or not, the fact that a well made Italian suit will set you back $10 at an op shop (or $5 at one I visited this morning!) or $2,000 from a shop in the city makes it essential that should I see one, the fee is trivial enough that should the garment be in good shape (I mean no moth holes) and a good cut it's always a bargain. One post-buy tip I have is to always have the item dry cleaned. Why? Dry cleaning kills moths and their eggs. If paying up to three times the cost of the suit puts you off, don't buy it: One or two little moth eggs could mean the ruin of your entire wardrobe. I learned this the hard way a few years ago. Bargain 1930s art deco style suit in Adelaide cost about $10. Got it home, little woman altered it for me (it had been let out more times than an old dog with irritable bowel syndrome) and it did look fine. Put it in the wardrobe and six months later paid $280 to invisible mend all the new moth holes! The note to self about the necessity of the dry clean was a big one.
OK, back to latest acquisition. I generally don't check out the suits in op shops these days, because as opposed to someone obsessed, I probably have enough. This one was a little big (aren't they all?) but really nice fabric. Since the pants were just a bit big, I altered them. Alterations for my smaller frame included splitting the back seam (the pants' bum crack) and taking up the hem. These mods are very easy, which is probably why my friend Jenni (Jack's daughter) suggested it as a good starting point to learn the art. Have to say that after sewing several women's garments and a men's shirt, it was almost too easy. The jacket will be a lot harder, so I'm not going to tackle it for a while.
Here are the pants:
photo of the pants

And I started to alter here (this is an after shot - you can see my alignment wasn't the best):
Misaligned but they fit. Taken down about 1 1/2 inches
Measure your waist before you start. Measure the pants too. Make sure of the amount you're taking it in by using a safety pin to hold it together. Does it fit nicely? Measure the amount you need to take in and if you're like me, write it down too.

Undo everything from the inside, but take note of the order in which you undo it: This is really important if you're not an expert (and if you were you wouldn't be reading this) it's too easy to stuff it up when reconstructing. So, get your seam ripper and undo the pants down to just above the crutch. You'll see how the seam allowance has just been folded back. Press this flat after unpicking, and leave the thread in (so you can see where the seam was). Mark the new seam such that it's the old seam line plus half the reduction on each side (I used a white dressmaking pencil), and reduce (taper) this new seam so that the other end is at the same point as before you unpicked it (the bit just above the crutch). That is, say the pants are 34". You have a 31" waist. The bit at the back (above) bust be reduced to 31", so fold and press the seam 1 1/2" more than the previous stitch line. Line up the bottom to where it was before.
Pin (even better to baste) this, sew it, then press (iron) the seam flat. I didn't bother trimming anything from the seams. I wore the pants last week, and although not as great as the other Italian ones, they felt pretty fine.
The back is where you start.

So that's the $10 Italian suit. I'll let you know if I get around to the jacket. If I do, it'll be as good as having it tailor made for me (if all goes according to plan, that is). Wish me luck!

Tuesday, 19 February 2013

Men's shirt patterns

Last time I mentioned the latest tailoring effort as a slim fit 1960s shirt. Well, after trawling for patterns it seems there isn't really one out there :-(
The closest I got were three 1960s patterns, but none of them seem to be slim fitting. I prefer the slim fit because it looks better on a slim man (now that I'm half the man I used to be - well, maybe 75%). We all need to use clothes to show us in our best light, don't we? The ladies certainly do (not so much these days, of course). In the U.S. two years ago it was really easy to find vintage shirts and suits, but they were all huge. Americans eat a lot more than Aussies, it seems. I'm currently wearing one of my thrift shop bargains though. An Italian suit, probably '90s but it doesn't matter when it fits this well. Classic design, with pin stripes, and very slim fit. The price? Same as a good op shop here: $10. Can't promise to ever learn to make suits, since it would take many years to make something even acceptable, but shirts are a different matter.
I hereby promise to attempt to create and publish an electronic pattern from the paper one I made my shirt from. Here are two pictures of it as it is now - I have yet to sew button holes on:
The seams are something my teacher's very proud of. Also, this machine sews beautifully, and it's just a pleasure to use it. The pedal looks bizarre - it's made of bakelite, and has a solid post right next to the switch for your foot to pivot on while you're using it, but it's very smooth. Some of this is probably the thorough clean and oil last week, but most is definitely due to the quality of the build back in 1960. Since teacher isn't here and I can't remember what it's called I won't go on about it, but side seams are pressed flat, then toward the back. The seam closest to the back is cut by half and the longer one folded over it. It's pinned in place like that and stitched. Looks very nice (better than the finish in the original shirt). The fabric was just what shirting was available, a nice plain green. Obviously you can make from something a bit groovier than this, but I chose the plain in case I screwed it up. Wasting 25 cents worth of fabric is not something I'd cry over. Besides, it'll still be a great looking shirt that feels good too. And that's not even mentioning that other feeling, of having made it!
Etsy seems to be the best place to find vintage patterns. The three I found earlier today are simplicity 4160, simplicity 7745 and butterick 5897. Just remember that pattern numbers are re-used so include 1960s in your search. I'll figure out some time how to digitise the pattern I have.

Monday, 18 February 2013

Singer 327K - Do I have a problem?

Well, duh :-)

Well, I did buy it prior to the 319K, and it was $5 (no foot controller). Here is a picture of the 327K:
Isn't she lovely? (If you also heard Stevie Wonder singing that just then you must be as old as I am). There was a problem: After cleaning and oiling, it still wouldn't sew (sigh). Tried several hours of tightening and loosening the bobbin and thread tension to discover that the actual needle bar had a slight bend in it! How could this happen? It's solid stainless steel, so I think someone must have dropped it. Luckily, there was a number on  it. Read it out to my (now) friends at sewparts, and Singer no longer make them. I was luckier on ebay, however, and two weeks later (U.S. postal service is now extremely slow) I have it. The machine now sews perfectly but of course I no longer need it. Oh well, the collection grows.
OK, back to the 319K. Here is another picture:
Her indoors is a pattern maker and made a shirt pattern based on a small Van Heusen from the 1960s. Very mod, and as I said I was itching to do something a little more manly than little girls' dresses (and skirts). The shirt is nearly finished and I've taken a few photos along the way. Next post, therefore, will be how to make a very attractive shirt. Unfortunately, I don't have a pattern number for you to search for, but if or when I learn how to digitise patterns, I'll publish it here :-)

Monday, 11 February 2013

Another new machine and tons of patterns!

Every now and then there's a garage sale of a deceased old lady who sewed in more of a serious way than most. Even better is if the old lady has always lived in that house, and it seems the stars were all in alignment on Saturday. She threw nothing away, including her two sewing machines. One was a Singer 201, the other a 319K. The start time being 8:30am and I got there around 8:25am. The 201 had a sticker with $150 on it next to another that said "sold". This machine looked Russian: Black, amazingly large and very industrial looking. The sewing room was also full of fabric. Aha! This is where one finds old fabrics (rather than op shops, as mentioned before). In amongst the fabric was patterns from the 1940s to 1990s! I got every pre-decimal pattern there, loads of fabric, then asked about the smaller green 319K. I ended up buying it for less than $100. It needs a bit of work, but it basically looks the same as this http://lempobee.blogspot.com.au/2011/03/singer-319k-green-machine.html except that it's in a cabinet. A picture will of course follow. It's full of levers and knobs. The manual came with it and after a few things get moved I'll be getting it ready for a new lease on life.
OK, getting sleepy as well as distracted by lempobee's cool 319K pictures. More later.
EDIT: Late again, but here's a picture of my new machine just before sleep takes me.
It's quite dirty (I haven't touched it yet), and I took out the needle since it was the wrong type. These machines take a needle specific to this model, and a different one was in the machine (wrong needles will really stuff it up, according to the experts - Google "singer 319 special needle"). This was possibly just put in for display though, or I'm hoping it was. Sewparts has the special needles, and I'm willing to wait. Besides, my eldest daughter's '50s godet skirt is now finished so there's no urgency.
Some of these machines, apparently, have been modified to take a normal needle, but technicians don't recommend this, and warn that it will seriously affect the machine's performance.
The manual that came with the machine explains in detail about using the special feet that come with them, and I have never used (except zipper feet of course).
Don't those levers look enticing? The machine has several built-in pattern (fashion) wheels which these levers activate. A couple of dozen extra wheels are included with the machine and attach to the front, on the thing above the "S" on the right side.
The cabinet needs a really good clean, sanding and varnish, and there's the weekend for that. More pictures and information later.