Showing posts with label 1960. Show all posts

Saturday, 5 September 2015

Top of the must-have list

Just after my first Pfaff (260PE) I could see how fantastic these late 1950s models are. When reading the manual for it the free arm version was mentioned, and I decided to keep an eye out for one. Another 260 late last year, which I sold a few months ago and I then knew how rare the free arm versions were. Apparently the higher the number the better the machine, option-wide.
There was also a logic to Pfaff's model numbers, unlike Singers. Under 100 is a straight stitch, 100 to 200 is the same as the other but add zig-zag. 200-300 add pattern cams, and 300-400 machines are free arms. The highest number I've seen is 362 but I can't imagine it being any better than a 360 (maybe an extra pattern?).

I saw one for sale a week or so ago and here it is:
It's a 260 with a free arm. The free arm is the easiest one ever. Spring loaded so you pull the table out to the left, lift it a bit, line it up and let go. Everything clicks into place and stays there. Oh you clever Germans! This is way ahead of Singer's efforts of the time. The only free arms they made were the 222K, which is straight stitch only, and the 320K2 which has a much larger arm and is simply not as good a machine as this. Additionally the latter was made in very small numbers because Singer couldn't mass produce them.
Feature #2: The stitch length indicator goes from 4 to 0, but at 1 it goes down very slowly. This isn't a gimmick, it will reliably feed fabric in the tiniest increment. Very useful indeed when using the embroidery patterns, which work superbly.
Feature #3: Look at the spool in the photo. Most thread spools were wound so they had to come off by spinning but some were stack wound, as for industrial machines and have to come off from one end or they twist. Pfaff catered for this by including a transverse spool holder. This clips easily to one of the vertical spool pins and allows you to use stack wound thread.

There are other nice things like needle threader (yes it still works) but they had to compromise a little with this design. The lack of space in the bed meant they had to use a smaller motor. It only has 2/3 of the power of the 260. Considering the 260 was incredibly fast, I have to say the 360s motor is still more than adequate.

Today I noticed two little problems, one caused by me. The first wasn't: The zig-zag set to maximum was skewed to one side. Solution was simple: There is a screw that is accessed at the rear of the left side of the machine which is a simple adjuster. Thanks again Pfaff! The second was because I insisted on cleaning and oiling when I got it. It really needed nothing at all. The previous owner had taken extraordinarily good care of it and it's really like a showroom one. When I put the bed back together, I just screwed the three screws down. Well, it seems there's a bit of play in the screws and I should have aligned them. The needle plate was right against the needle and deflecting it just a little. When I set it to zig-zag, it kept catching the hook during its left swing and I broke two needles before realising what was wrong. At least they're ordinary domestic needles and I learned something about my new favourite.

Won't mention how much it was, but it wasn't much. Luckily the lady was just happy it went to a good home.

Friday, 17 July 2015

Kids' Pyjamas Butterick 9987 1960

This was a pretty easy garment to make. My great nephew (a large-ish two year old) will be cosy and warm when he gets them (view B), but it was really difficult to find a natural fabric with animals printed on it. My go-to shop didn't have any either! It should have been flannelette but I had to struggle with cotton jersey.


This needs a special needle, a jersey needle (yes, duh!).
The fabric wasn't that much more difficult but any thickness and it won't stitch. This was especially the case when I didn't trim the collar seam allowance. I did it to keep as much fabric as possible on the garment (it is a cold Winter in south eastern Australia) but I shouldn't have done it. As a consequence I couldn't do a buttonhole for the top button. I felt he probably wouldn't use it anyway (definitely, if it's not there!). The buttonholer does a rubbish job on this fabric and when it gets up to four layers it won't catch the thread at all.
Quite a good pattern, though.
You could sew the whole thing in a day, and I recommend the crazy cat pattern, but not jersey fabric: Very cute!


Monday, 3 November 2014

Bernina 642-1 semi-industrial 1960

I had my doubts as to whether a "semi-industrial" even exists, but it's just what Singer called "industrial - for home use" or "light industrial". The first sign is the motor, which seems as fast as an industrial - quite remarkable for such a small motor. This actually makes it hard to do some things, like, well, sewing slowly, embroidery etc. Real industrial machines never have an attached motor.
Unlike the 630/730/830 it has a full rotary hook, and still a vertical bobbin so you can do embroidery (in theory at least).
Also it's a flat bed machine, and no cam stack. It says on needlebar that it can be converted into a full automatic machine. I just Googled for this and couldn't find what an automatic machine is. Singer use the same terminology: In the adjuster's manual for the 206/306/319 series, they only list the 319 as automatic. Now the biggest difference between the 306 and the 319 is that the latter has a cam stack, or built-in stitch patterns. My new Bernina doesn't have a cam stack so I'll assume this is what it means. To be honest cam stacks are nice but who really uses them? I don't use decorative stitches for anything but demonstrating them as a feature and never when constructing a garment, so they won't be missed. During garment construction I only ever use zig-zag and straight stitch, which brings me to another feature of this machine: The longest stitch is really very long! Haven't measured it but it's longer than any domestic I have.
OK, on to the machine's specifics.
Bernina 642-1. 1960, straight stitch and zig-zag, super fast, flat bed and Bernina green a-la 730. Here's a picture:
She came in a really nice Swedish cabinet, too. My father is currently giving that the love it needs to look new again, but after cleaning I did some sewing with the head free standing. Nice but starts vibrating a bit at full speed. It was very clean probably due to being inside a cabinet. The previous owner used it all the time for a business, and the motor brushes were worn almost to the spring! It had the original green bobbin winder (it looked like it had melted), which I replaced with a more usable black one, and cleaned it for hours and am very happy with the result. It came with the original feet and some needles.
Didn't come with a manual but if the lady finds it she'll call me. They don't exist as free DLs anywhere on the Internet so if I get one, I'll scan it and make it available as a pdf, free of charge.
I'll update with cabinet pictures when dad has worked his magic.

Thursday, 6 March 2014

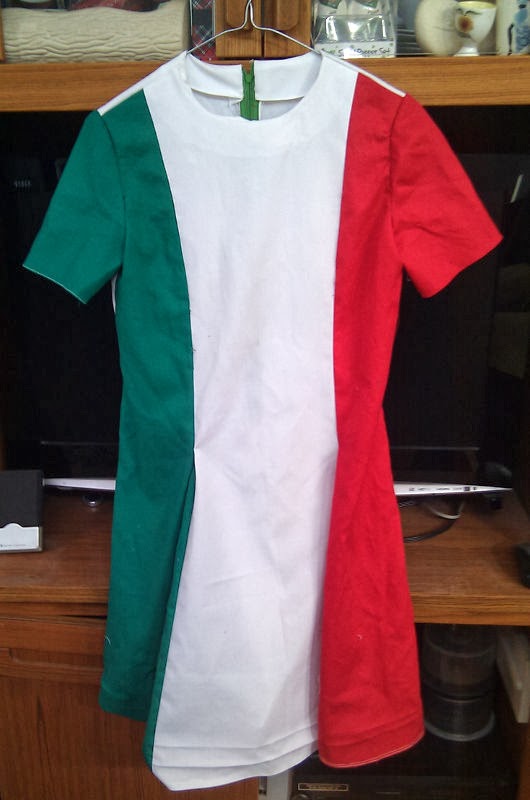
Italian day again, new dress. Fixing your colours.

My daughter's Italian day dress got ruined when I washed it. Yes, it was me. However, I hadn't expected the fabric not to be colourfast. According to the lady in Spotlight, none of the fabric they sell is! So, what do you do? According to most sources, brine (salt water) is the way to get the colour to stay in the fabric. I also read that if the fabric is silk vinegar is more appropriate. For some reason, I started getting cravings for fish and chips when reading about this.

So, carefully selected some red and some green drill then started the tests. Cut off a little red and dropped it into some water. Yes, the colour started haemorrhaging instantly. The green just as bad. Couple of litres of water and about 1/2 a cup of salt and lowered all of the red into it. A couple of hours later rinsed it and not much came out! Great stuff. Emptied it and repeated with the green.

So, with Simplicity 5945 (view 1), I simply replaced the side panels with a green on one side and a red on the other.


It was easy to make this and only took half a day to get this far:
Didn't have to ask for help either. Love it when this happens. Means I'm learning something or the pattern was ridiculously simple. Well, bit of both perhaps.
Here is the final  dress, modelled by the girl:

Same as the other one except for hemming and the bow.
The hemming was done on a Singer 319K I picked up free of charge two weeks ago. It was seized but a full weekend later and it's really very smooth and beautiful. Had to re-do the wiring too. Would have done the whole dress on this machine except a few days ago I won a 1960 401a on eBay for $13.45, also not working. Funny how easy it is to get these things working and it was hard to select one for this job, seeing as both were seemingly perfectly suited. The 401a got the most work done but when I tried blind hemming it, I needed instructions. The 320K2 manual is the only one I had at hand, so grabbed it. They were specifically for the 320/319 so I grabbed the 319 and got to work. I have to say, Singer designed some amazing machines in the late 1950s. Both of these machines were made around the same time, and they're both smooth and almost faultless. If I were making or hemming jeans, though, I'd go for a 201 or my 96K. The small motors aren't really up to it.

Sunday, 23 February 2014

Another freebie

On Gumtree the other day there was a 319K in a treadle cabinet. Strange thing, because although the cabinet is the same era the machine had its own original motor and light. So of course I separated them. Popped a 227 head into the cabinet with a new treadle belt and the 319K went into a Pfaff portable box.
The 319 is in absolutely amazing condition. Well it is now: I spent two whole days cleaning oiling and setting things, as the machine was pretty much in need of everything. The needle in there was not the correct 206x13 or even the commonly substituted 15x1, but a round shank industrial. Best not to mess about, so I didn't test it out. The power lead had insulation that was falling off so the plug wasn't going anywhere near the 240V outlet.
How she came to me
The service book is available from the yahoo group's files. Pictures aren't clear but the information is there. I went through everything possible, hence the two day restoration. It also came with a full set of discs.
Here's what it looks like now:
It took a really long time to get the bight width lever right. The problem was that it was seized up. I moved it a little with the pliers and cloth, but no amount of oil was going to get this thing moving properly. Taking it apart revealed a load of gunk just about everywhere. Took a long time to de-gunk it but it's now like new!
If you do this job on this model, I'd advise you don't do it without the service manual.